Easy And Gooey Italian Sliders
These Easy Italian Sliders are perfect if you’re looking to feed a bunch of people all at once because they’re insanely delicious and super easy to make.
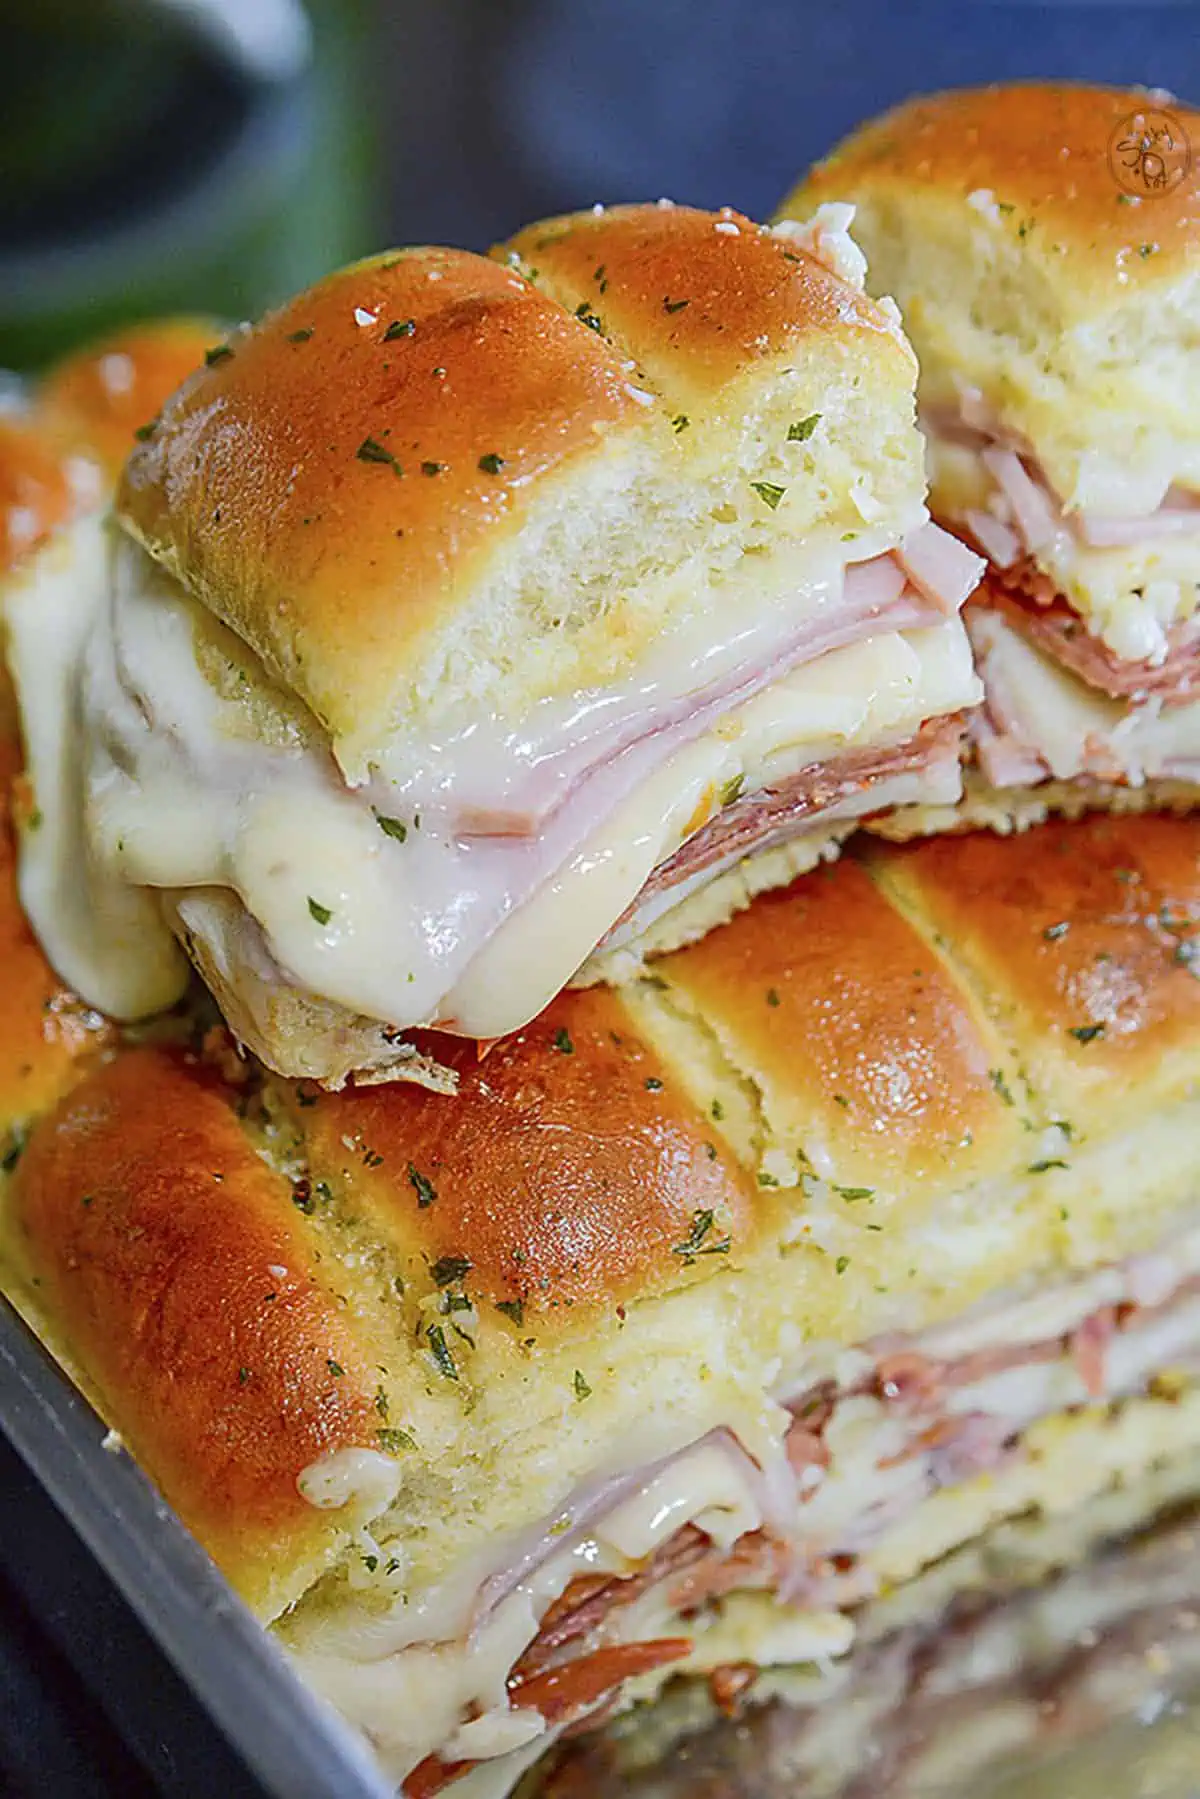
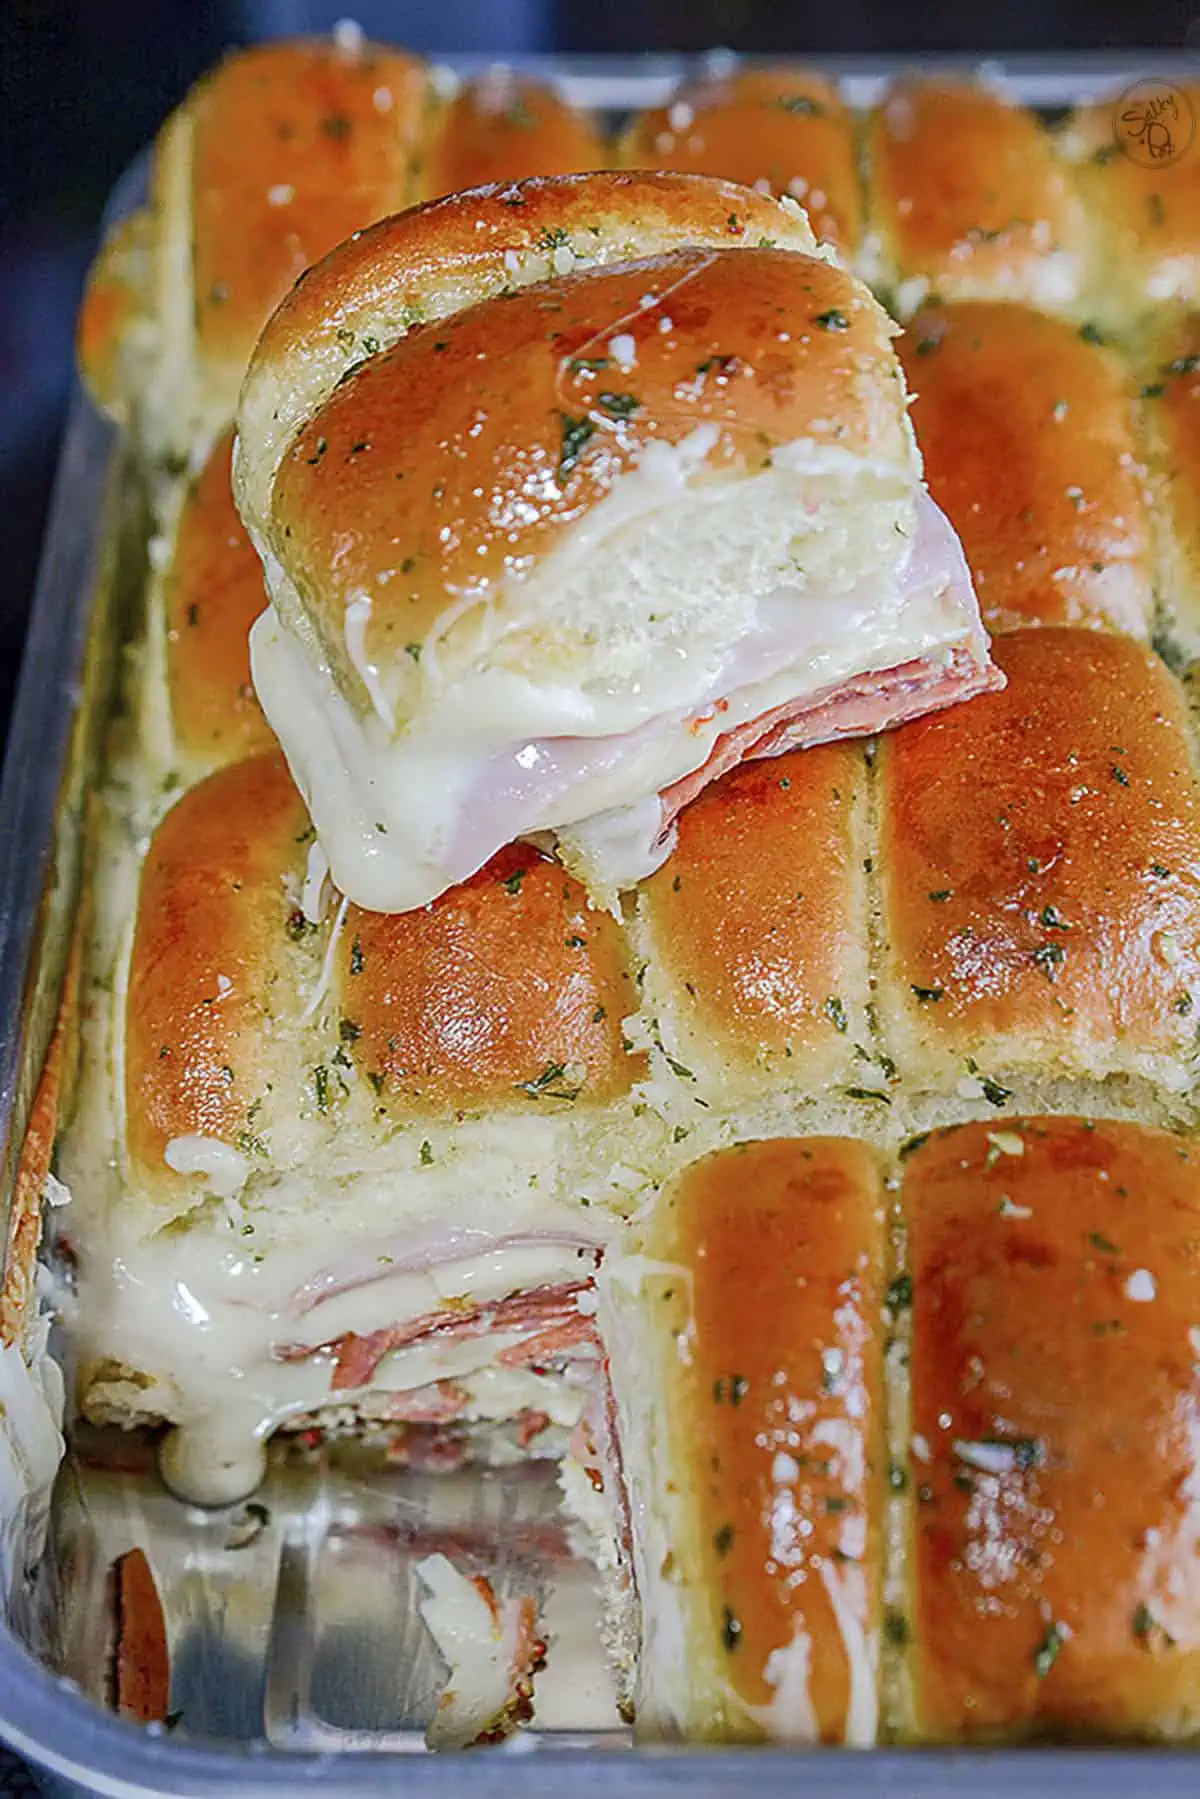
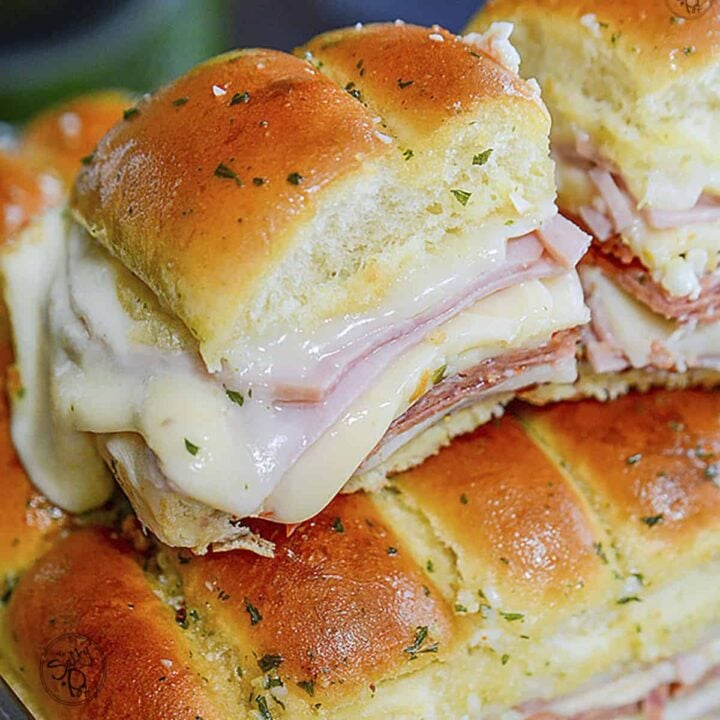
Served warm, the cheese is melty and gooey, and the buttery toasty top of the buns, and the assorted deli cuts sandwiched between the cheese make these easy sliders out of this world.
All this scrumptious goodness makes them a perfect game day (or ANY day) food to serve. I’ll bet that when you serve these buns of pure goodness, you’ll be asked repeatedly to make them for every event. You’ve been warned!
Super Easy Italian Sliders
Straight to the point here – if you make these and feed them to family and friends, they will eat them up so fast and you’ll be asked over and over again to bring them to the next event because they’re just THAT delicious.
They’re super easy to make, super tasty, and they can easily feed a crowd! With minimal effort, these adorable little munchies will bring smiles to all who sample them!
The ingredients are simple to find at the grocery store which makes these even easier to make, and the recipe is versatile, so you can switch a few things up to make it your own.
Ingredients For This Slider Recipe
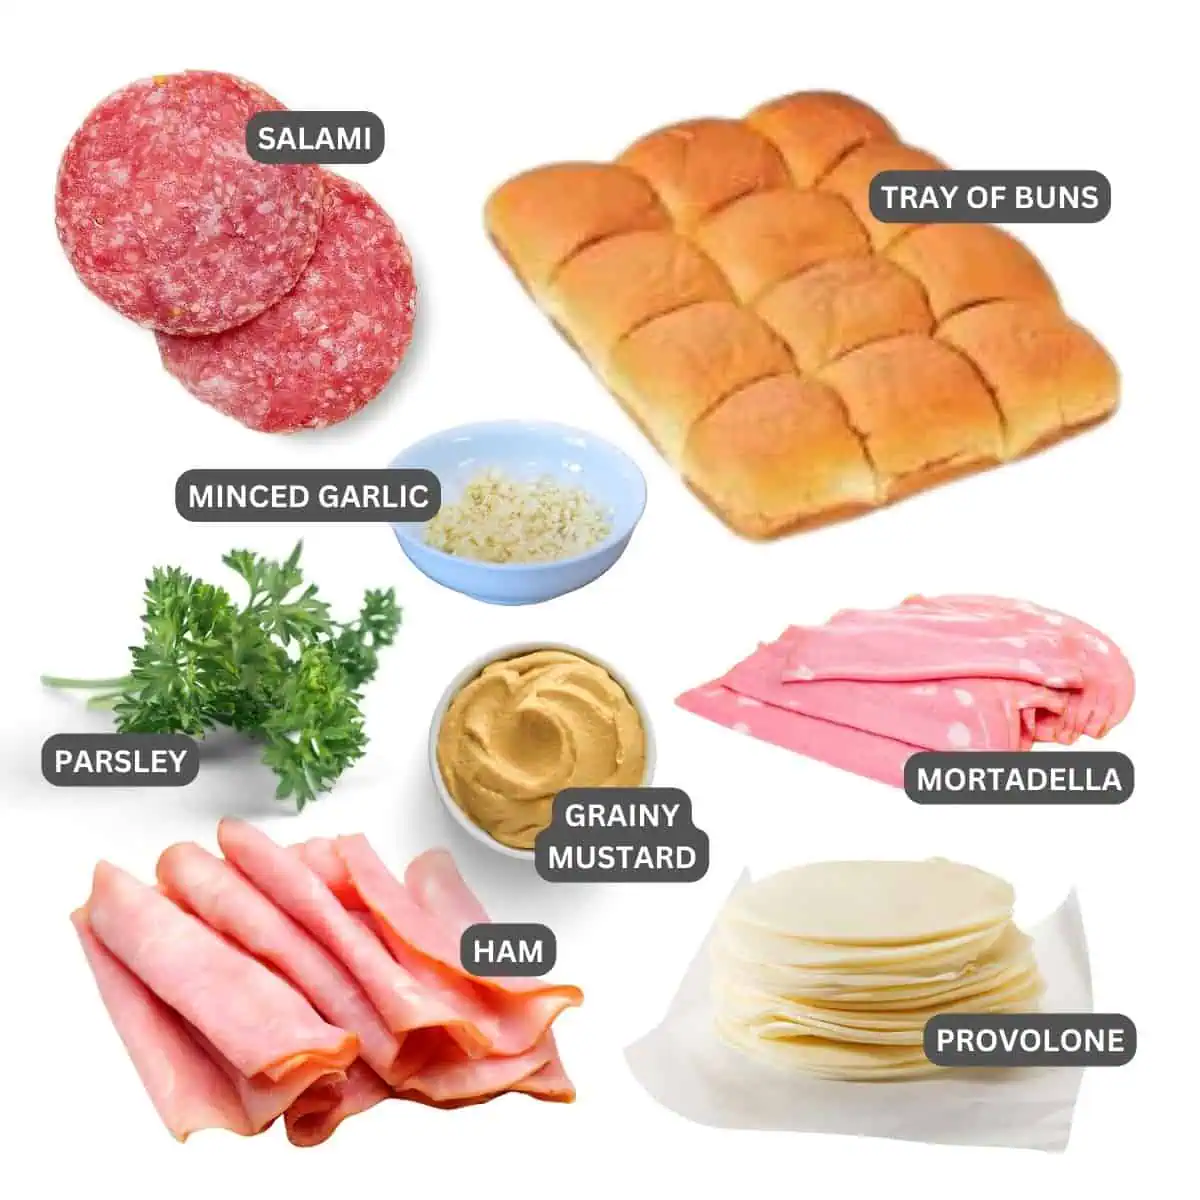
- Deli Meat Slices – I use ham, salami, and mortadella for my sliders, and depending on the size of the slice, I used 6-10 slices EACH. I like the saltiness of the ham and the richness of the mortadella. The salami has a nice, rich tanginess that’s so good, that I usually sneak a piece or two while making these sliders.
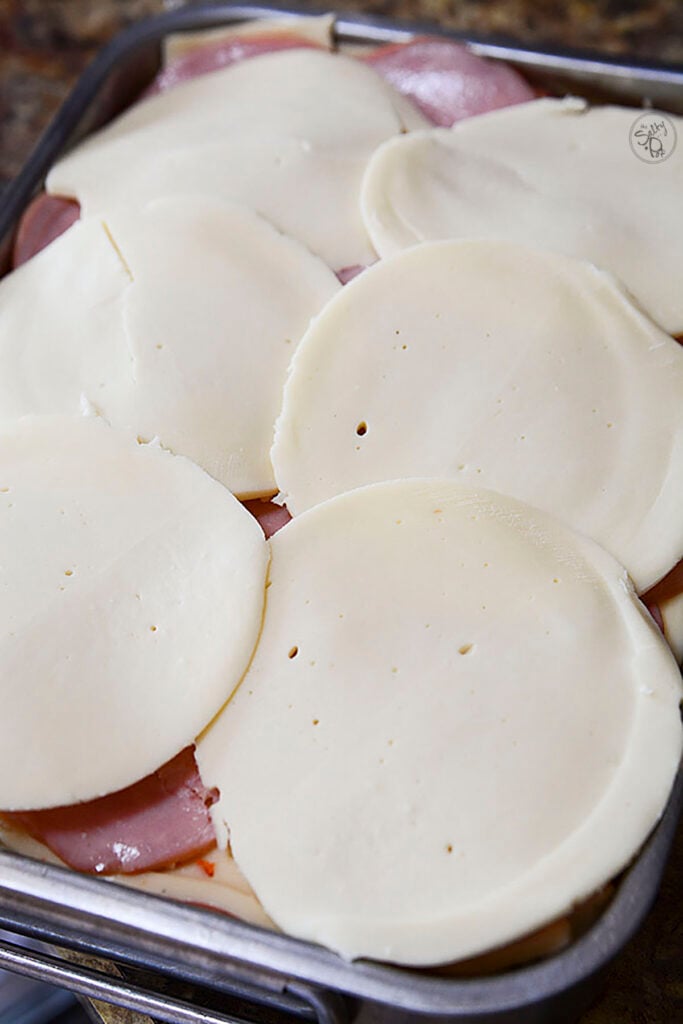
- Cheese – Provolone is a good choice, but don’t feel stuck to only that type of sliced cheese if you don’t care for it. While it’s not an Italian cheese, havarti would be excellent, as would gruyere. The best choice is to choose a cheese you love the flavor of and one that melts nicely.
- Mustard – I recommend a mild grainy mustard because it compliments the meat selection well. But again, use a hotter or different type of mustard that’s your favorite.
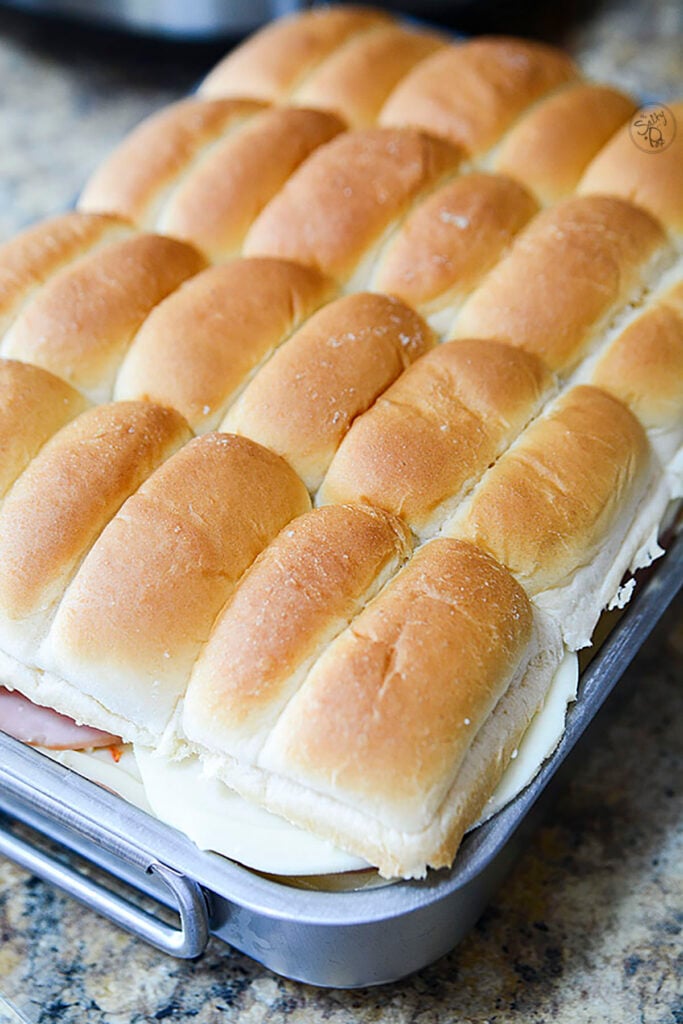
- Buns – My favorite type of buns to use are plain tray buns or even Parker house rolls. I have used Hawaiian rolls as well, and they work nicely. I recommend using tray buns though, ones that are stuck together when they are baked.
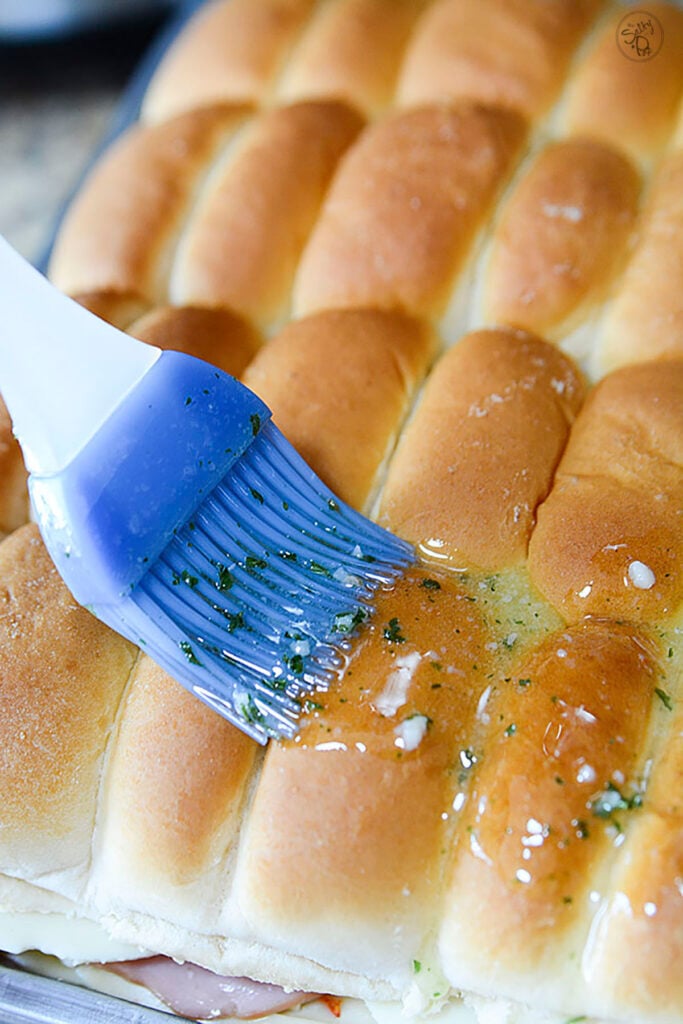
- Topping for the buns – Butter, minced garlic and parsley.
How To Make Easy Italian Sliders
PREP: Preheat the oven to 350F.
STEP 1: Cut The Buns. On a flat surface, turn the knife parallel to the buns and slice the entire tray horizontally in half. Remove the top portion and set aside for now. Transfer the bottom buns to a greased baking pan.

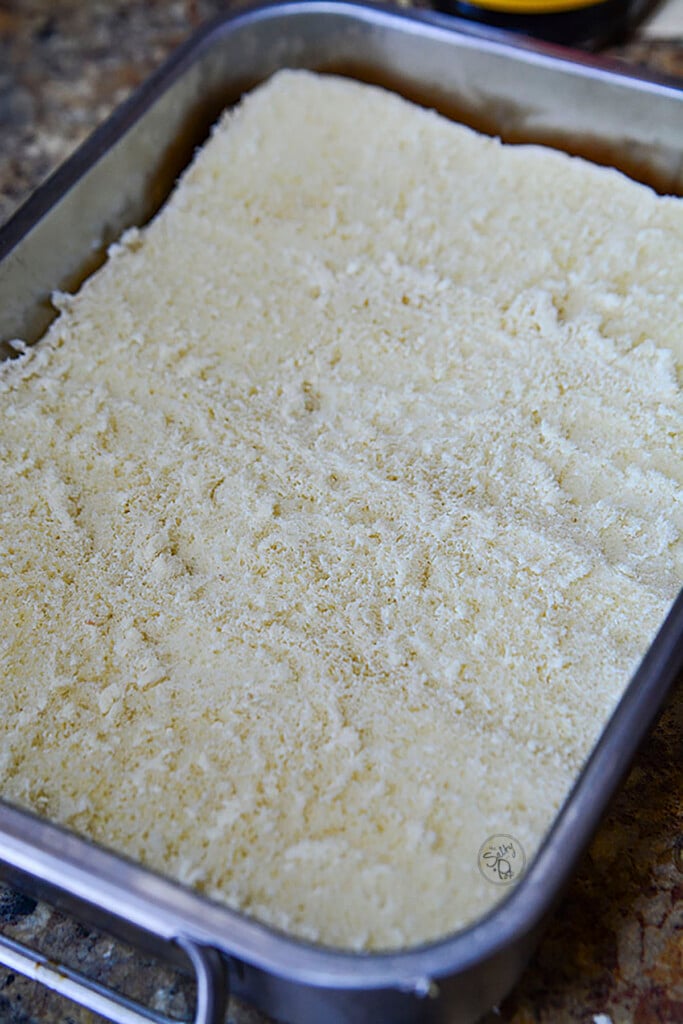
STEP 2: Place Condiments and Meats. Spread the mustard evenly over the bottom half of the buns. Add a layer of deli meat to cover and fit the surface of the tray buns.

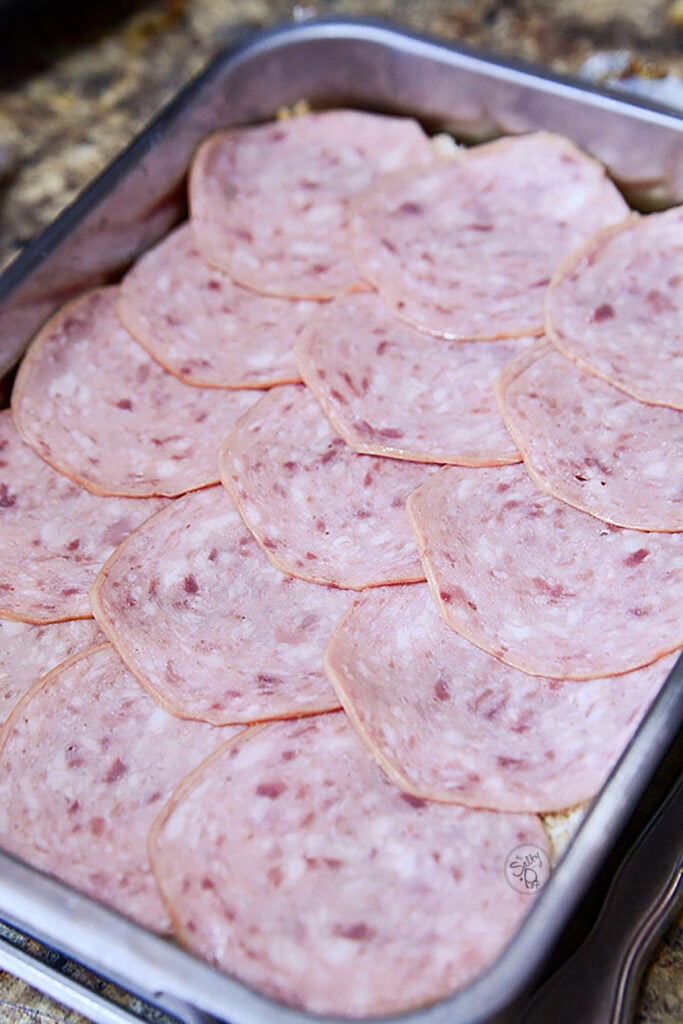
STEP 3: Layer the Cheese and remaining meats. Add your first layer of cheese to cover the first deli meat layer. Then after the cheese, layer the remaining meats and finish with adding the last layer of cheese.
STEP 4: Add the Top Buns. Cover the layers with the top portion of the buns.
STEP 5: Butter the Tops. Melt the butter, garlic, and parsley together in a bowl. Mix and brush over the tops of the buns before they go into the oven. Reserve a little of the mixture to butter again after they come out of the oven if you like.

STEP 6: Remove From Oven. After the sliders have warmed through, and the cheese has melted and the tops of the buns are golden, take them out and let them sit for just a few minutes.
Tips To Make The Recipe Perfect
- Patience when cutting the buns. Take your time with this, you’ll want to do it as evenly as possible. If you dip here or there or get it a bit crooked, it’s no big deal. It all tastes amazing in the end anyway but you want to do your best in getting it even as possible.
- Feeding more than 12 people is easy. Cut and make two tray buns worth of sliders and they can be baked in the oven on a baking sheet or, even better, a 9×13 if your tray buns will fit.
- Serving the buns when they come out of the oven is advisable, even though they will be very warm. The cheese is gooey and all the flavors of the deli meats are heightened because of the heat.
How To Make Baked Sliders Ahead Of Time
I like to make them the morning of the day you want to serve them. Anything before that could give you a funny texture because of the moisture. Place them in the dish you’ll bake them in, assemble, and then cover tightly with plastic wrap and keep them in the fridge until you’re ready to bake. Wait until you’re ready to put them into the oven to butter them up.
I don’t recommend freezing these sliders. These are the kind of tailgating, or party food that is best eaten fresh. However, they’ll stay great in the fridge, in an air-tight container or zip lock bag for about 2 days.
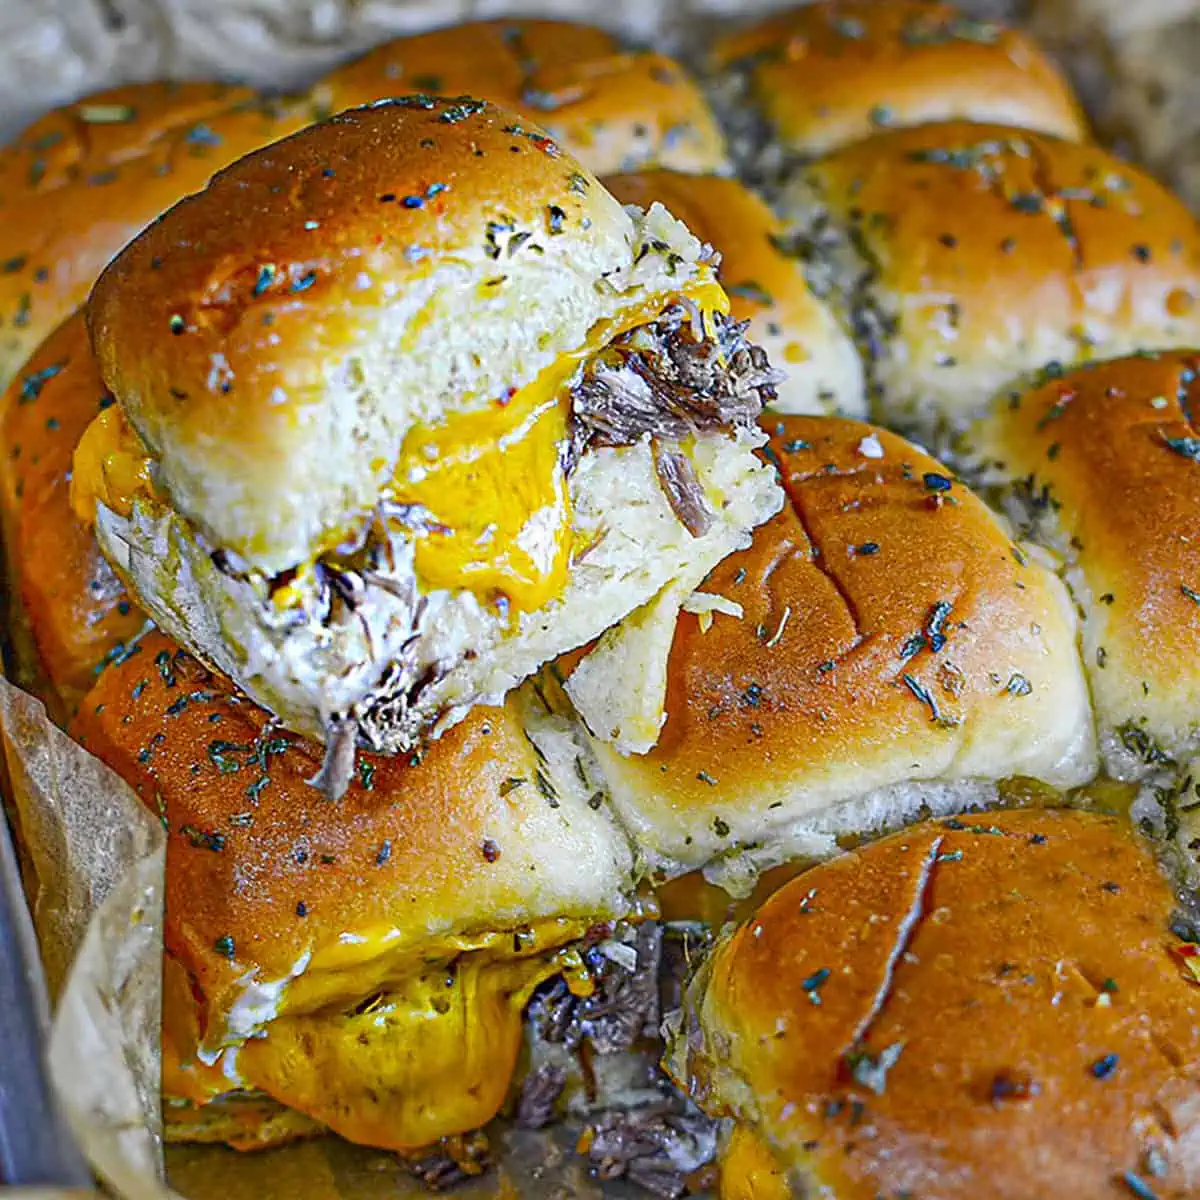
If you’re looking for other slider recipes to serve alongside these Italian sliders, take a peek at my Brisket Sliders made with leftover beef. Another popular slider recipe on the blog is my Chicken Cordon Bleu Sliders – you’ll never guess what I use for the chicken part of them!
Serving The Sliders
The sky is the limit here. My favorite go-to sides are my Creamy Dill Pickle Pasta Salad which offers a great contrast to the slider because it’s served chilled. (You can make that ahead of time as well!).
Another side I would suggest would be a veggie plate with White Bean Mediterranean Hummus, or Corn on the Cob if you want to serve a warm side dish.
If you’re looking for a few other sandwich-y type recipes, click to check out this Instant Pot Mississippi Pork Dips recipe, or these buffalo chicken boats. All those recipes are designed for super easy party food!
Did you make these Italian sliders? I’d love to know what you thought of the recipe by leaving a comment below and/or rating the recipe in the recipe card!
Thank you SO much for taking the time and stopping by The Salty Pot today! I hope you have a wonderful day!! (and a wonderful party!! 😉
Easy Italian Sliders
These Easy Italian Sliders are made up of savory deli meats, provolone cheese, seasonings, and deliciously fresh buns. When served warm, the flavorful meats with the melty cheese make this combination of slider requested over and over at all the functions!
Ingredients
- 12 buns, a tray of buns
- 6 - 8 ham slices
- 6 - 8 salami slices
- 6 - 8 mortadella slices
- 12 - 18 provolone slices
- 2-3 tbsp grainy mustard
- 1/4 c butter
- 1 tbsp minced garlic
- as desired, parsley
Instructions
- Preheat oven to 350
- Cut the tray of buns horizontally
- Fit the bottom buns (still attached to eachother) onto, or into a baking sheet or pan
- Spread the bottom buns with the mustard.
- Begin layering the pieces of mortadella, then slices of cheese, then the salami, then the cheese, etc.
- When all layers are done, replace the top layer of the buns.
- Melt the butter and add the garlic and parsley. Brush onto the top of the buns
- Bake in the oven for approximately 12 - 15 minutes or until the cheese has melted and the tops of the buns are browned.
- Remove and let rest for 5 minutes, then cut and serve!
- Enjoy!
Notes
Be sure to use the freshest ingredients possible. The buns should be soft and fresh as they will crisp up nicely in the oven.
Feel free to mix up the cheeses to what you have on hand or what your preferences are.
If you don't have a seedy dijon mustard, regular dijon works, or even a ball park mustard does as well, but use sparingly.
Nutrition Information:
Yield: 12 Serving Size: 1 bunAmount Per Serving: Calories: 438Total Fat: 24gSaturated Fat: 12gTrans Fat: 0gUnsaturated Fat: 10gCholesterol: 80mgSodium: 1394mgCarbohydrates: 26gFiber: 1gSugar: 4gProtein: 29g
All nutritional information is based on third-party calculations and is only an estimate. Each recipe and nutritional value will vary depending on the brands you use, measuring methods, and portion sizes per household.

Hi, can i put these in an air fryer to heat up?
Hi Jenn, I’ve never done it to be honest, but I think it’s worth a shot. I would keep the temp on the lower side, and also cover the sliders with foil so they don’t burn on the top before heating through. If you try it, please let me know and I’ll update the post!
It says 6-8 slices of each meat but the pictures show 12. can you clarify for me? Thanks!
Lori
Hi Lori – It’s really a case of ‘it depends’. lol…. It will depend on the size of the slices you’re using and the size of the slider buns. I like to buy extra to make sure there’s good coverage and if there’s extra, it’s a cook’s snack! Hope this helps!
This may be a stupid question, I am really interested in making this for a get together coming up. They don’t look like they can be pulled apart. Do they cut nicely once they are out of the oven and sit for 5 minutes?
The comments all are very positive, I just want to be prepared, before I serve them.
Thanks,
Jean
Hi Jean! Your question is not stupid at all! So yes, they can be pulled apart, but they may not pull apart as cleanly as you might want. So if you want a nice, clean separation, then maybe it’s best to use a knife when they come out of the oven. Your other option is to pull apart the buns individually and then place them back together closely, and pre-slicing the meats and cheese so they sort of stick to their own buns when you pull them apart after baking.
Honestly though, I’ve never had a problem with pulling them apart because most ppl will take one or two at a time and they separate nicely. But again, if you want clean individual cuts, just slice them when they are done baking. I hope this helps!
I made these tonight for dinner and it was a huge hit! My husband asked me when I came back from the grocery store, “What did you find in Pinterest?”. I told him and his only thing is he does not like mustard. When I made them, he could smell them. Once they came out of the oven, he was foaming at the mouth. He loved them! I am always looking for something different to make. This was very quick, very easy and tasted absolutely amazing!
Sandra
Ammon, ID
Oh Sandra, I’m absolutely thrilled that you and your hubby enjoyed the sliders!! They are really easy to make and you get a huge bang for your flavor buck with these sliders. Thank you SO much for taking your time to comment on the blog!!
These look so good. Having Bunco party Thursday night at my house going to fix these. Any suggestions what to serve with them? Pasta salad, salad , beans ,chips ? Need ideals. Thanks so much
Thank you Betty!! They are really delicious 🙂 Everything you suggested would go really well with these sliders. They’re so versatile. Pasta salad would be a fantastic pairing for sure! Marinated veggie salads go well too. Let me know what you served with them and have fun at the Bunco party!
LOVE this recipe. ❤️💕
We’ve made it twice this week. I have to double it for my family. I work such long hours but I can make them fast and hot when I get home.
thanks Thanks THANKS‼️,
Dobie
Thanks so much for making my day Dobie!!!! Yaaaaayyy!!!
These look delicious and easy enough – will definitely be trying them at the next get together. Also, this is may sound weird, but I love your writing style… I typically skim through articles like these until I get to the recipe, but I was abnormally engaged with your words! 🙂
Thank you SO much, Elizabeth!!! You TOTALLY made my day!!!! (The blogging industry isn’t for the faint of heart, believe it or not, so when I read comments like this, it makes all the long hours and hard work COMPLETELY worth it!!!)
Tried these tonight with fresh fruit and yogurt on the side. Even my picky eaters love them! Thanks for sharing!
Yaaaayyy!!! That’s so awesome Shannon!! I”m thrilled that everyone liked the recipe!! Thank you for taking your time and commenting!
Would you knownoff the top of your head the calories for these?
Hey Kyle! I don’t know off the top of my head, no, but if you go to My Fitness Pal, they have a calorie calculator that I hear is pretty good. Sorry I couldn’t help you more on this!
I was wondering if you are only two, can you freeze the rest. If so how long can you freeze them. I love the idea of ham and salami, but can I omit Mortedella and replace that with turkey and replace provolone with Swiss. Sincerely, Sylvia
Hello Sylvia!! So nice to hear from you and thank you for taking the time to comment 🙂
Ok, so yes, I think you can freeze them. That being said, I’ve never done it personally, however, if I were to, I would assemble them in smaller groups, maybe 4 or 6 at a time. Then, I would also freeze them UNBAKED. That way, when you’re ready, you can either thaw the amount you want to eat and put them in the oven. I don’t know how well they would reheat already baked. I would simply freeze them assembled but unbaked so that they would be much fresher tasting when you want to bake them up.
You can certainly omit whatever meats and cheeses you prefer and replace with your favorites! Some cheeses melt differently than others, so just keep that in mind, but as far as taste goes, it’s all up to whatever you find delicious! I’d love to hear from you when you make this recipe up Sylvia! Have a wonderful day!
Could I prep this the night before a party then add the garlic butter before I put it in the oven?
Hi Ehm! You know, I think you could. The only thing I would be really sure of is to cover the entire thing (tray buns with all ingredients) with plastic wrap and place it in the fridge. The bread would dry out if it wasn’t covered properly. Other than that, I don’t see why you couldn’t!
Let it come to room temperature before you put it in the oven though because you want everything to be heated through before the tops get brown. 🙂
Let me know how it goes, and thanks so much for commenting!!
These are REALLY GOOD!
Thank you so much for commenting Jessica!!!