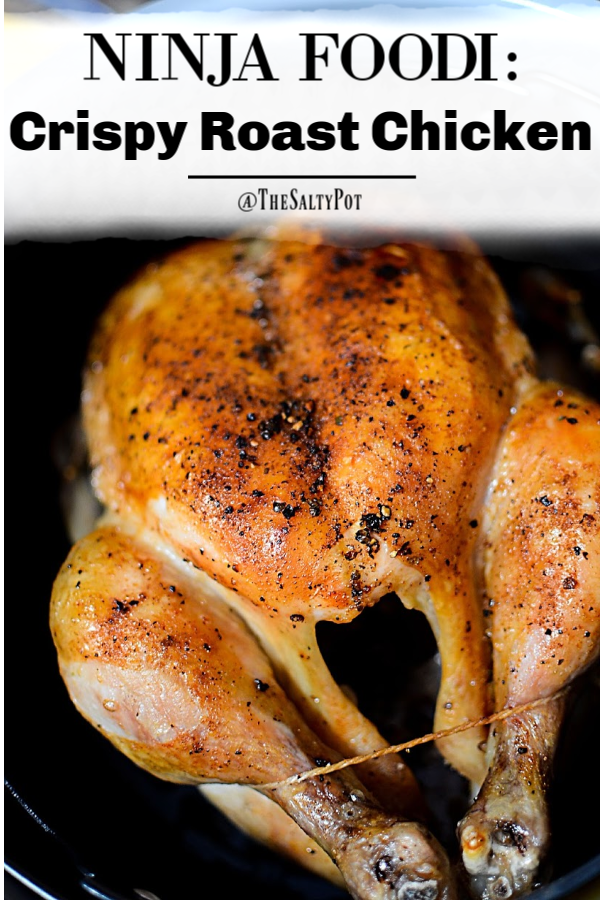
Ninja Foodi Roast Chicken
Roasting a chicken in the Ninja Foodi or Instant Pot is easy as easy can be. Seriously. The hardest thing I’d say is actually hefting up that 3 1/2 – 4lb bird into the roasting pot. Again, seriously! Keep on a’ readin’ to see exactly how you can achieve this yourself.
No more dried-out rotisserie chicken for you, my friend! Hello Ninja Foodi Chicken – the best roast chicken you’ll make!
Whole Chicken In The Ninja Foodi
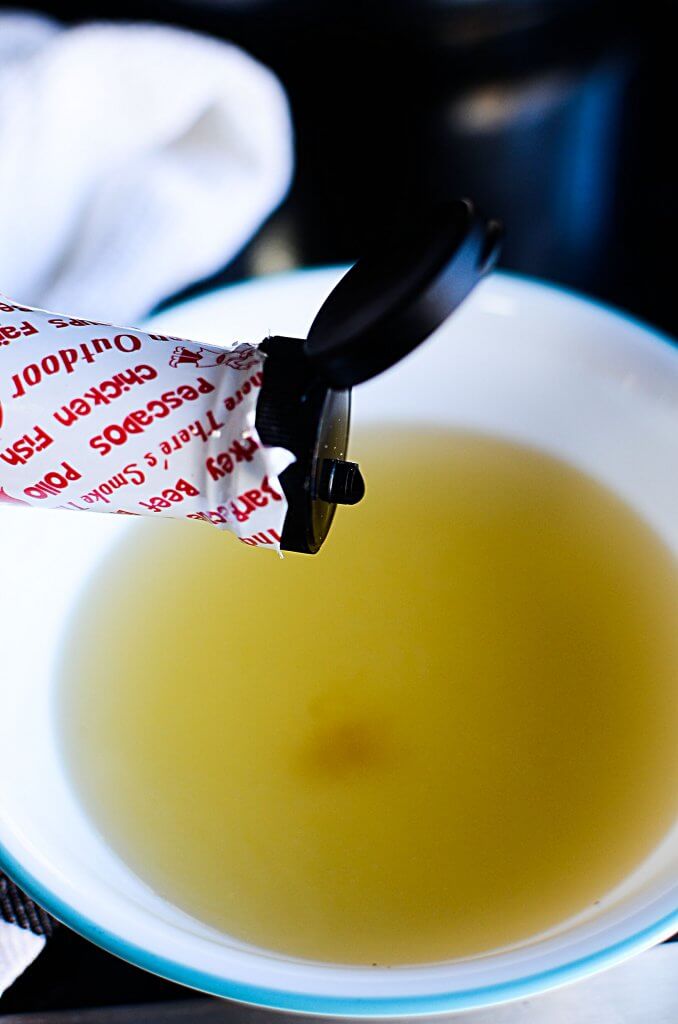
Let’s start by seasoning the water. YES,.. the water!! I know right? But believe me when I say that adding seasoning to the water will help make your end product just THAT much more tasty! Add one or two drops of liquid smoke to the water. I know it sounds odd.. but it really gives it that little bit extra, you know??
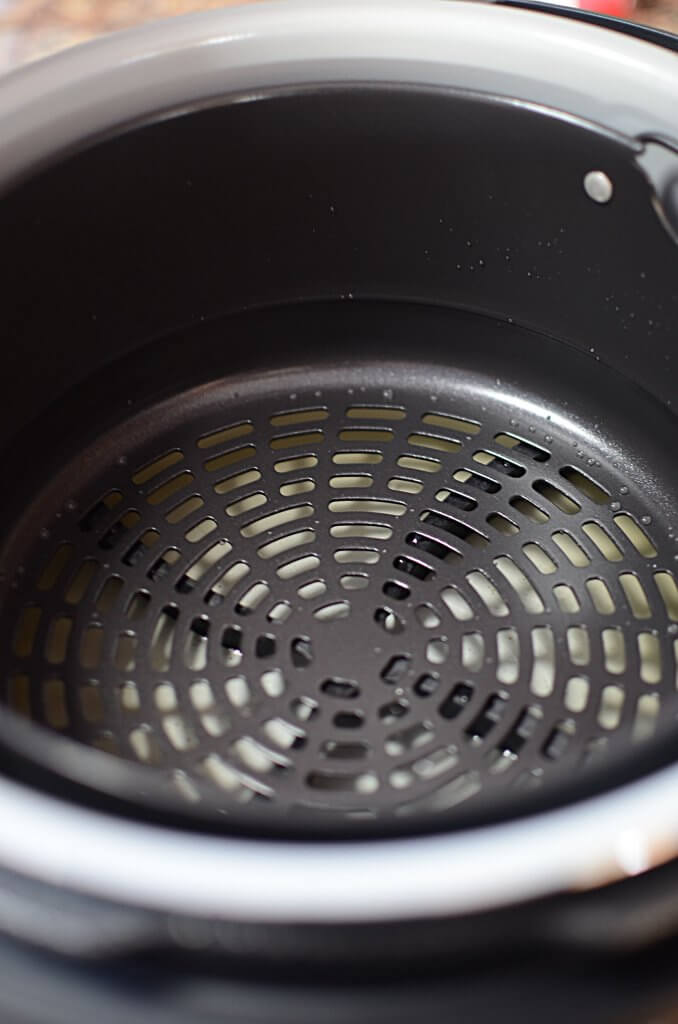
So put that water at the bottom of the cooking pot and then place the air fry basket inside, on top of the water.
Let’s now season the chicken. Easy peasy.
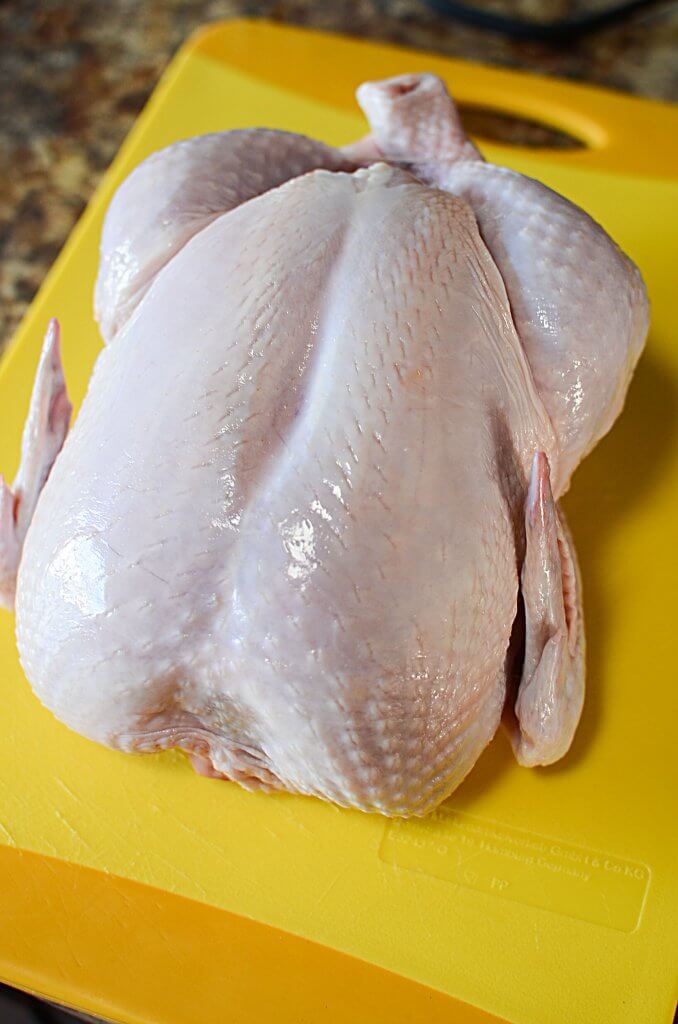
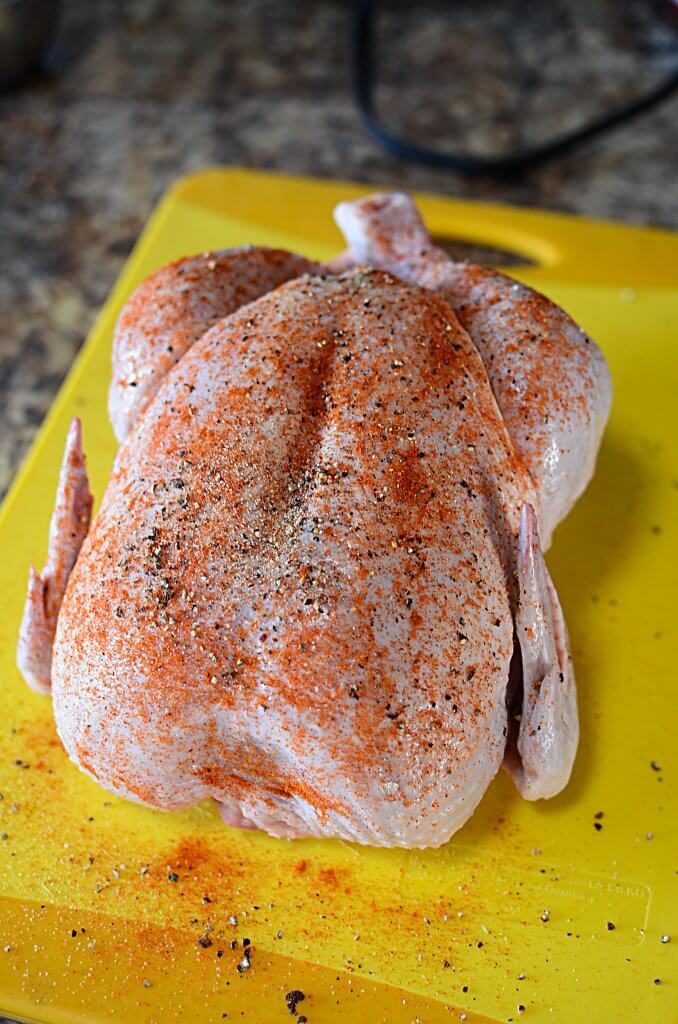
Season the chicken with the spices listed below (both inside and out, btw), but don’t remove the tie around the chicken. You could, but then it gets all splayed out and a bit more difficult to wrangle.. and come on now.. who wants to wrangle a raw chicken?? Nah, not me thanks! 🙂
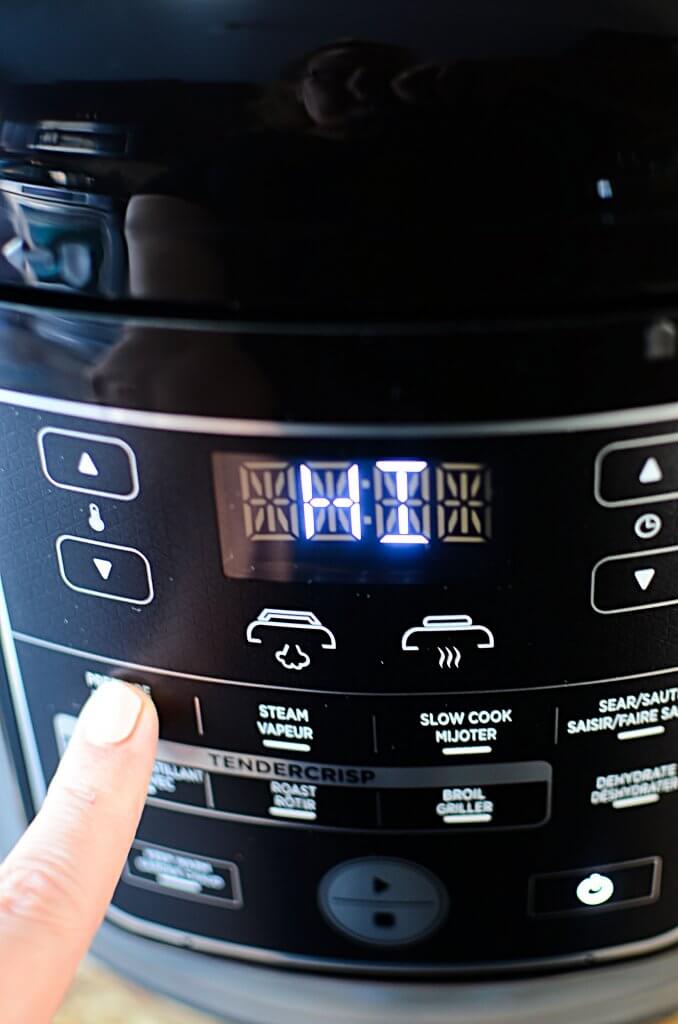
FOODI ROAST CHICKEN: Pressure cooking
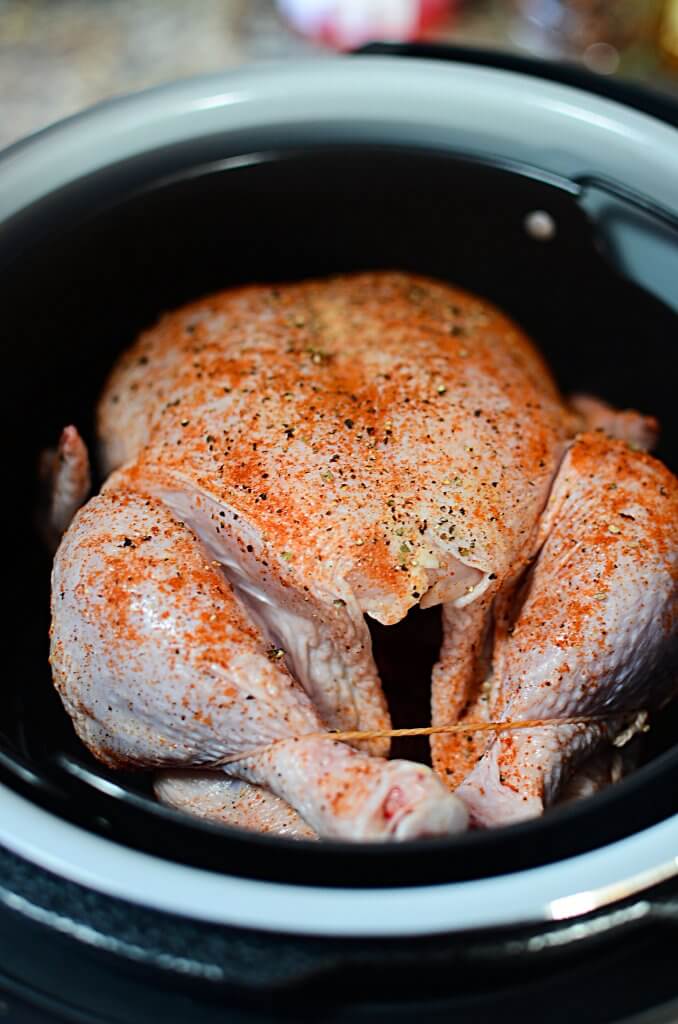
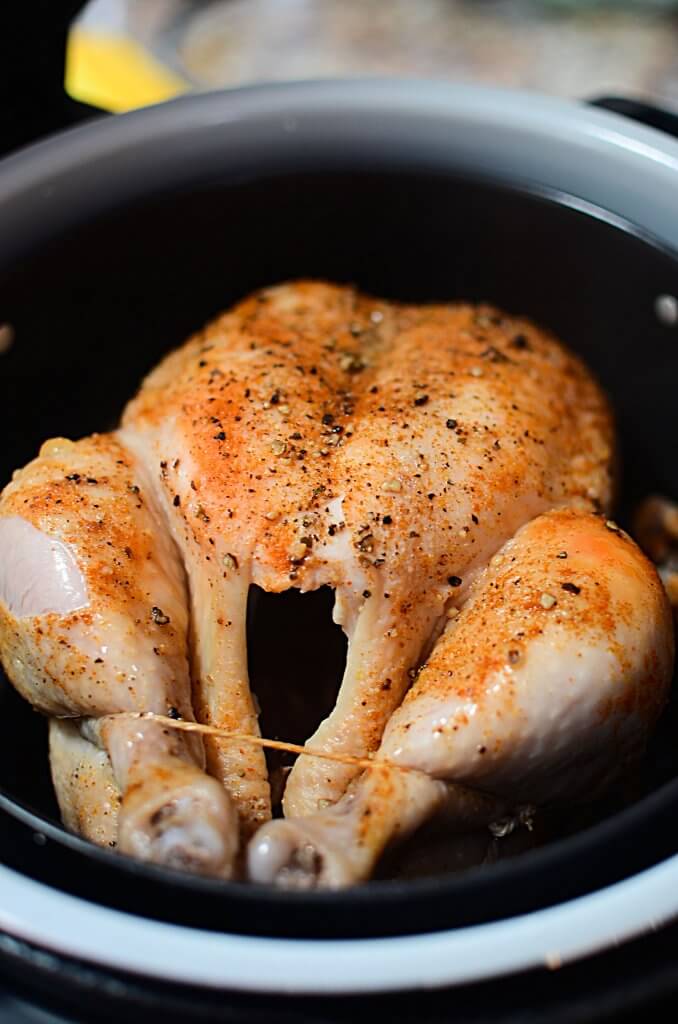
So after seasoning, place the chicken in the air fry basket, breast side up. Place the pressure cooking lid on the pot, lining up the arrows and turning to lock.
Be sure the lid switch is in the sealing position.
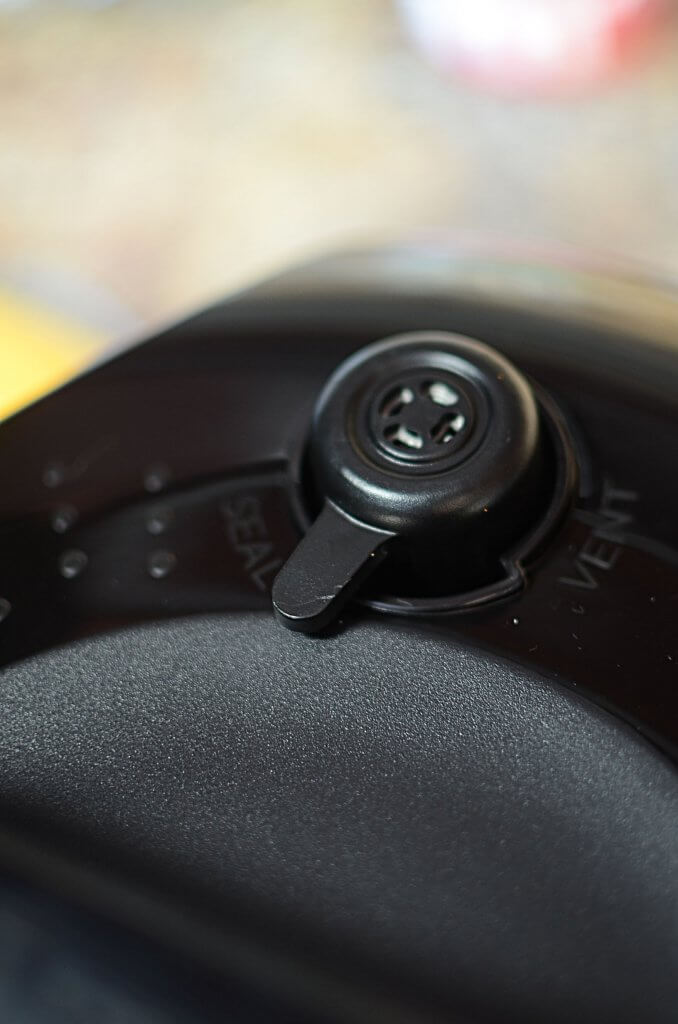
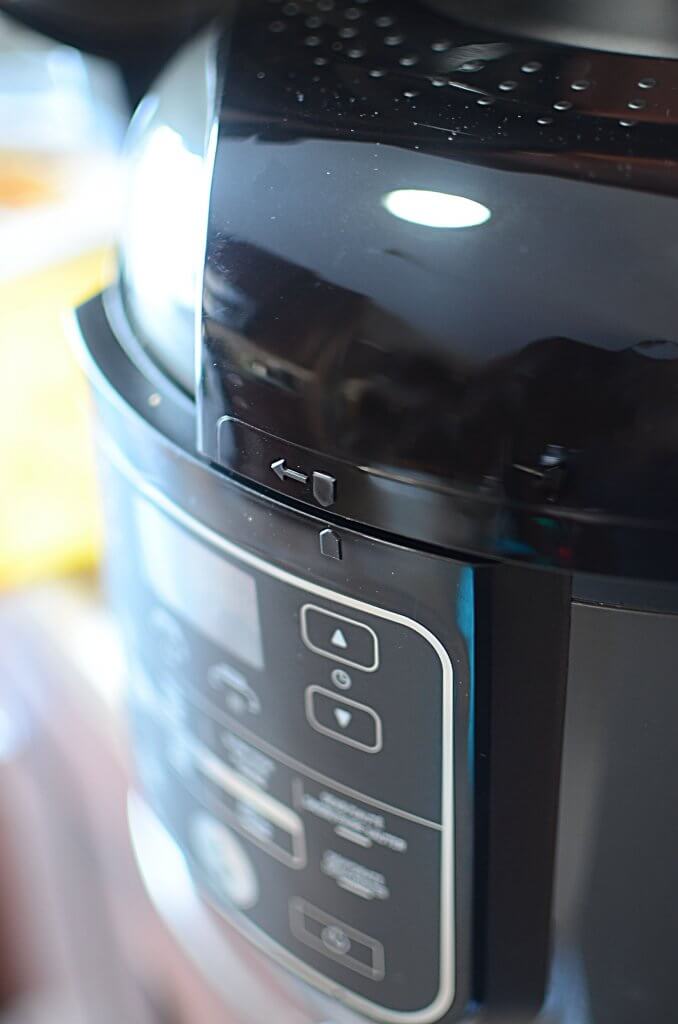
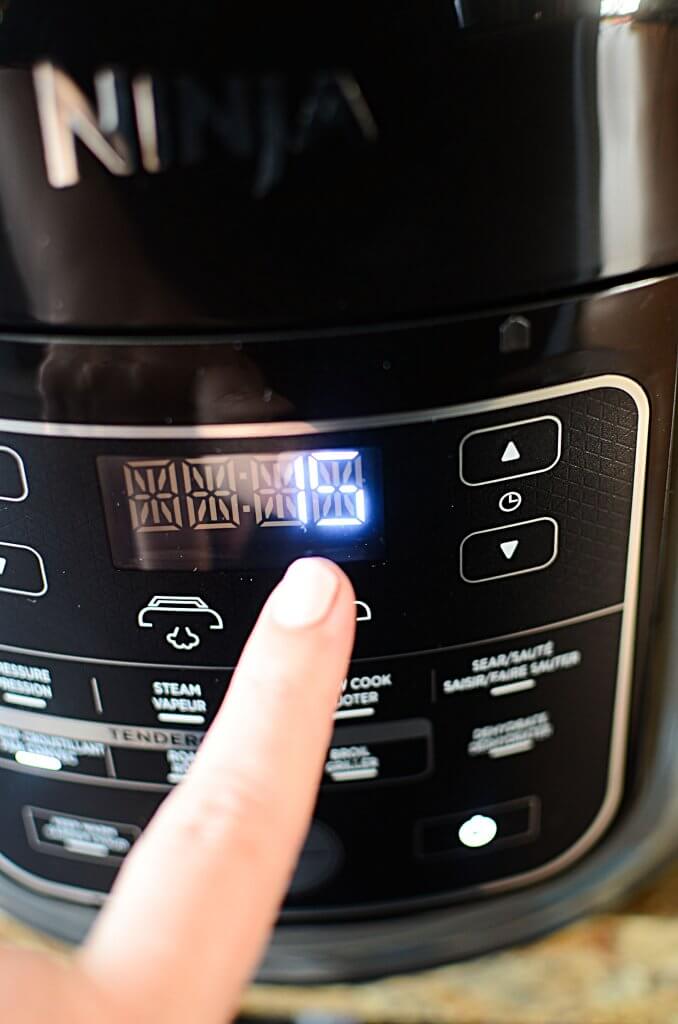
Press “pressure” on High, for 15 minutes. Let it go! Keep in mind the pot will take some time to come to pressure. The LCD display on the front will circle around for a bit and then the time will display and start counting down. When the time is up, do a quick release by turning the toggle switch from “sealing” to “venting”.
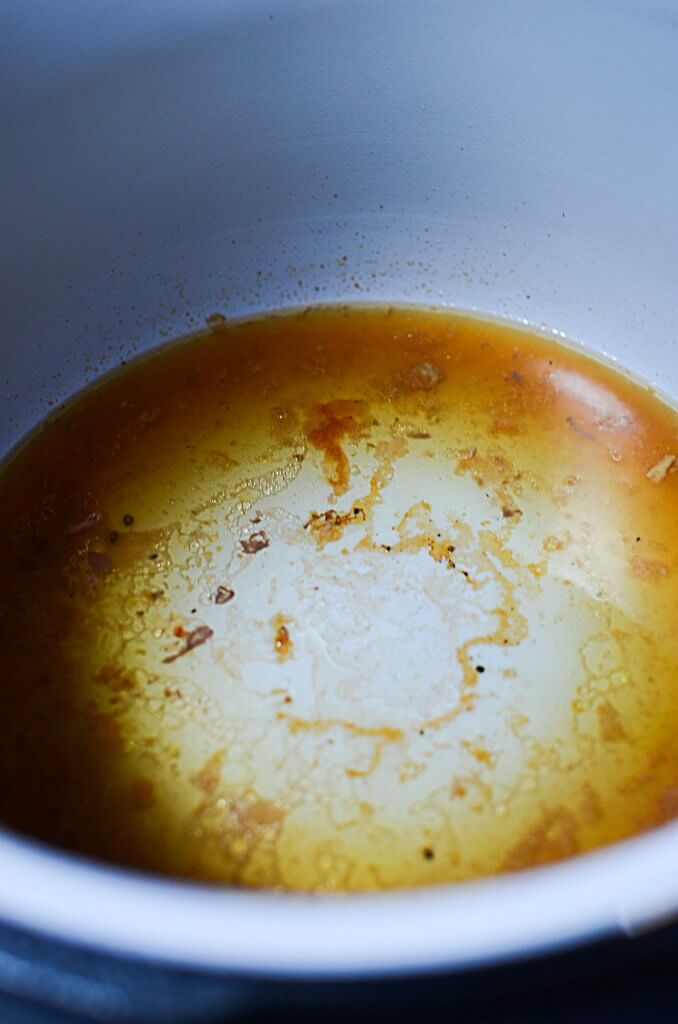
Carefully remove the lid, and with oven mitts, lift out the air basket tray. Drain the liquid accumulated in the main pot. Return the chicken and the basket back into the Foodi bowl.
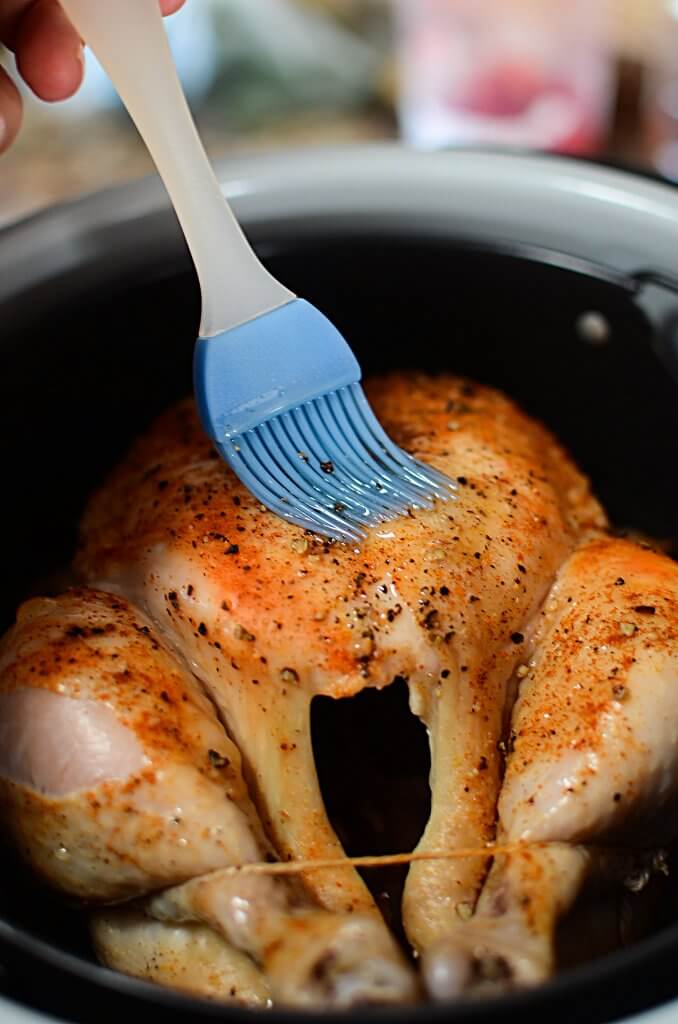
In a bowl, melt the butter and season with salt, pepper and garlic powder together. Brush this over the entire chicken as well as possible.
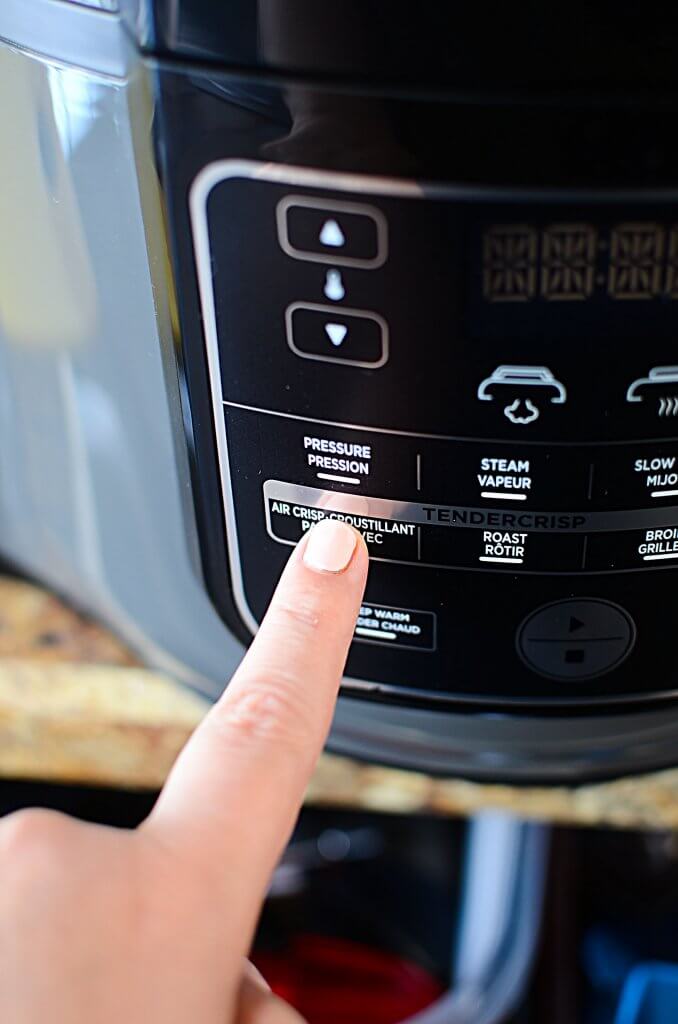
FOODI ROAST CHICKEN: Air Crisping
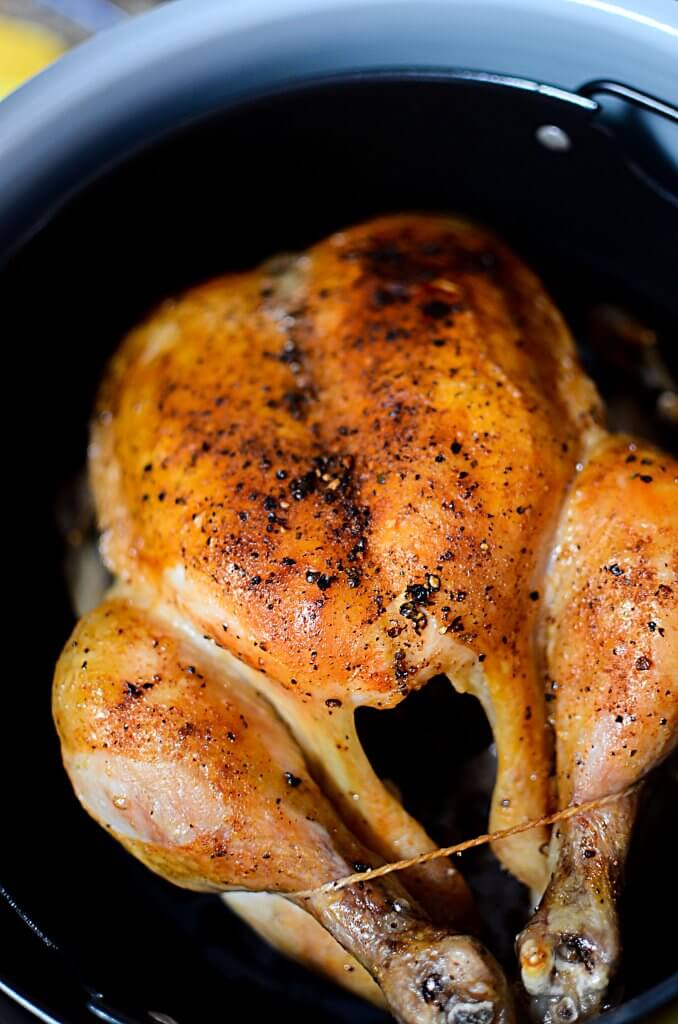
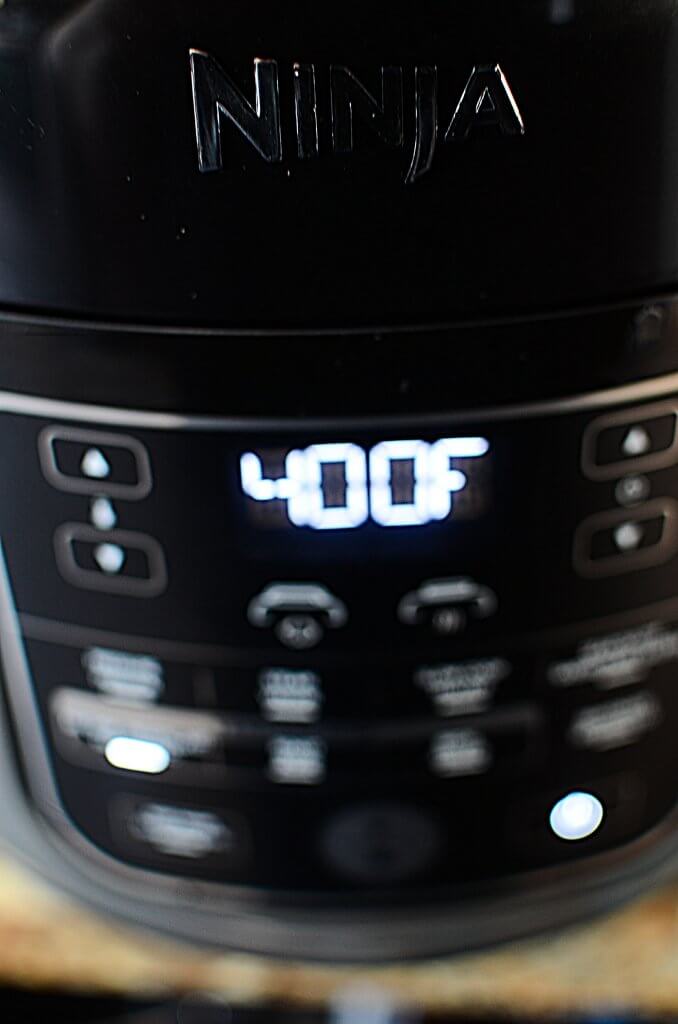
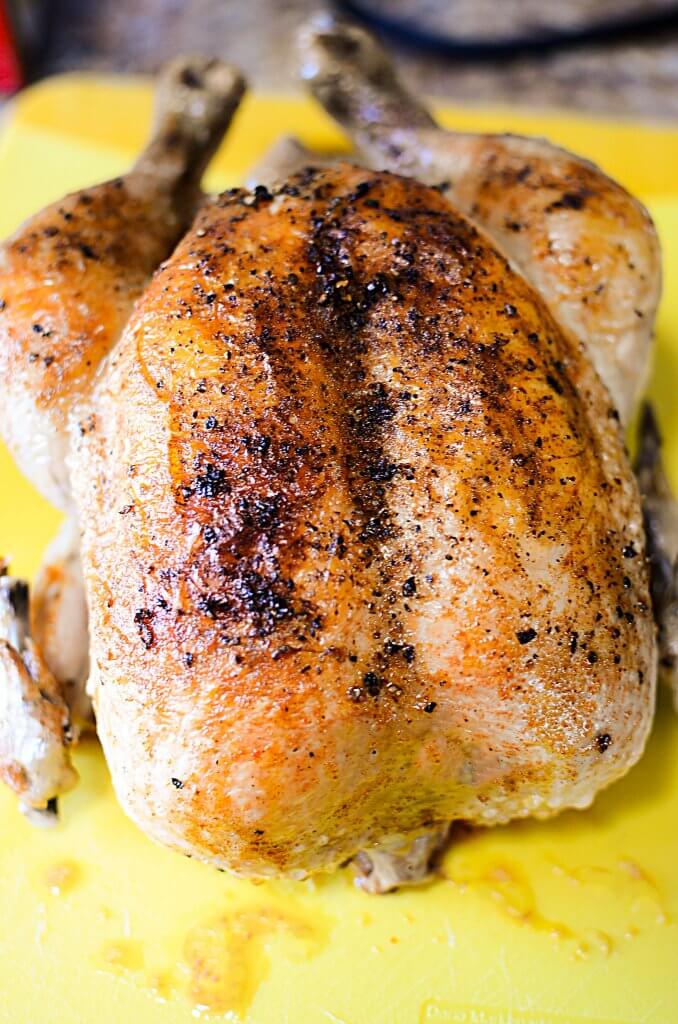
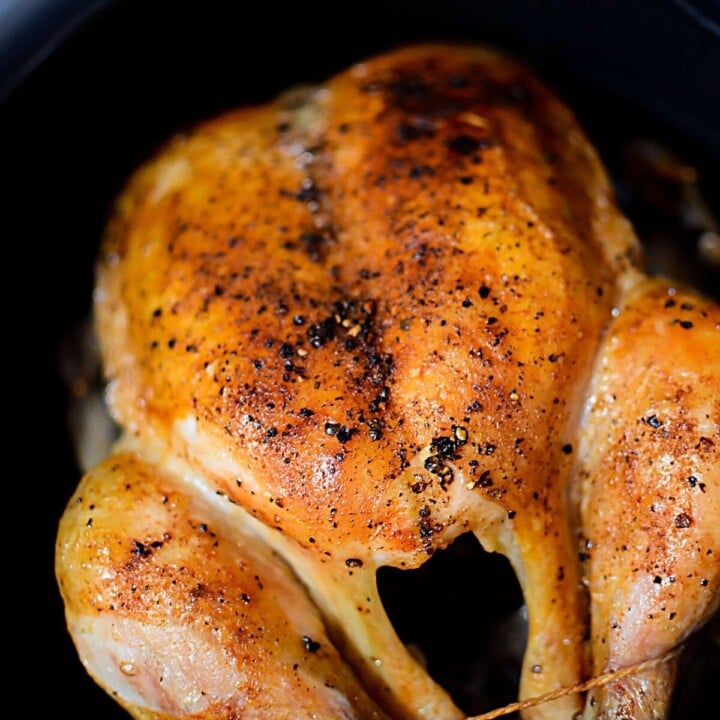
Cover with the air fry lid and choose the “air crisp” function, turn the temperature to 400 degrees and choose 15 minutes again for the time. Let it go. The best part about this is that you can peek on the chicken as it’s crisping, so you can get the perfect amount of crisp and browning that you’d prefer on the chicken!
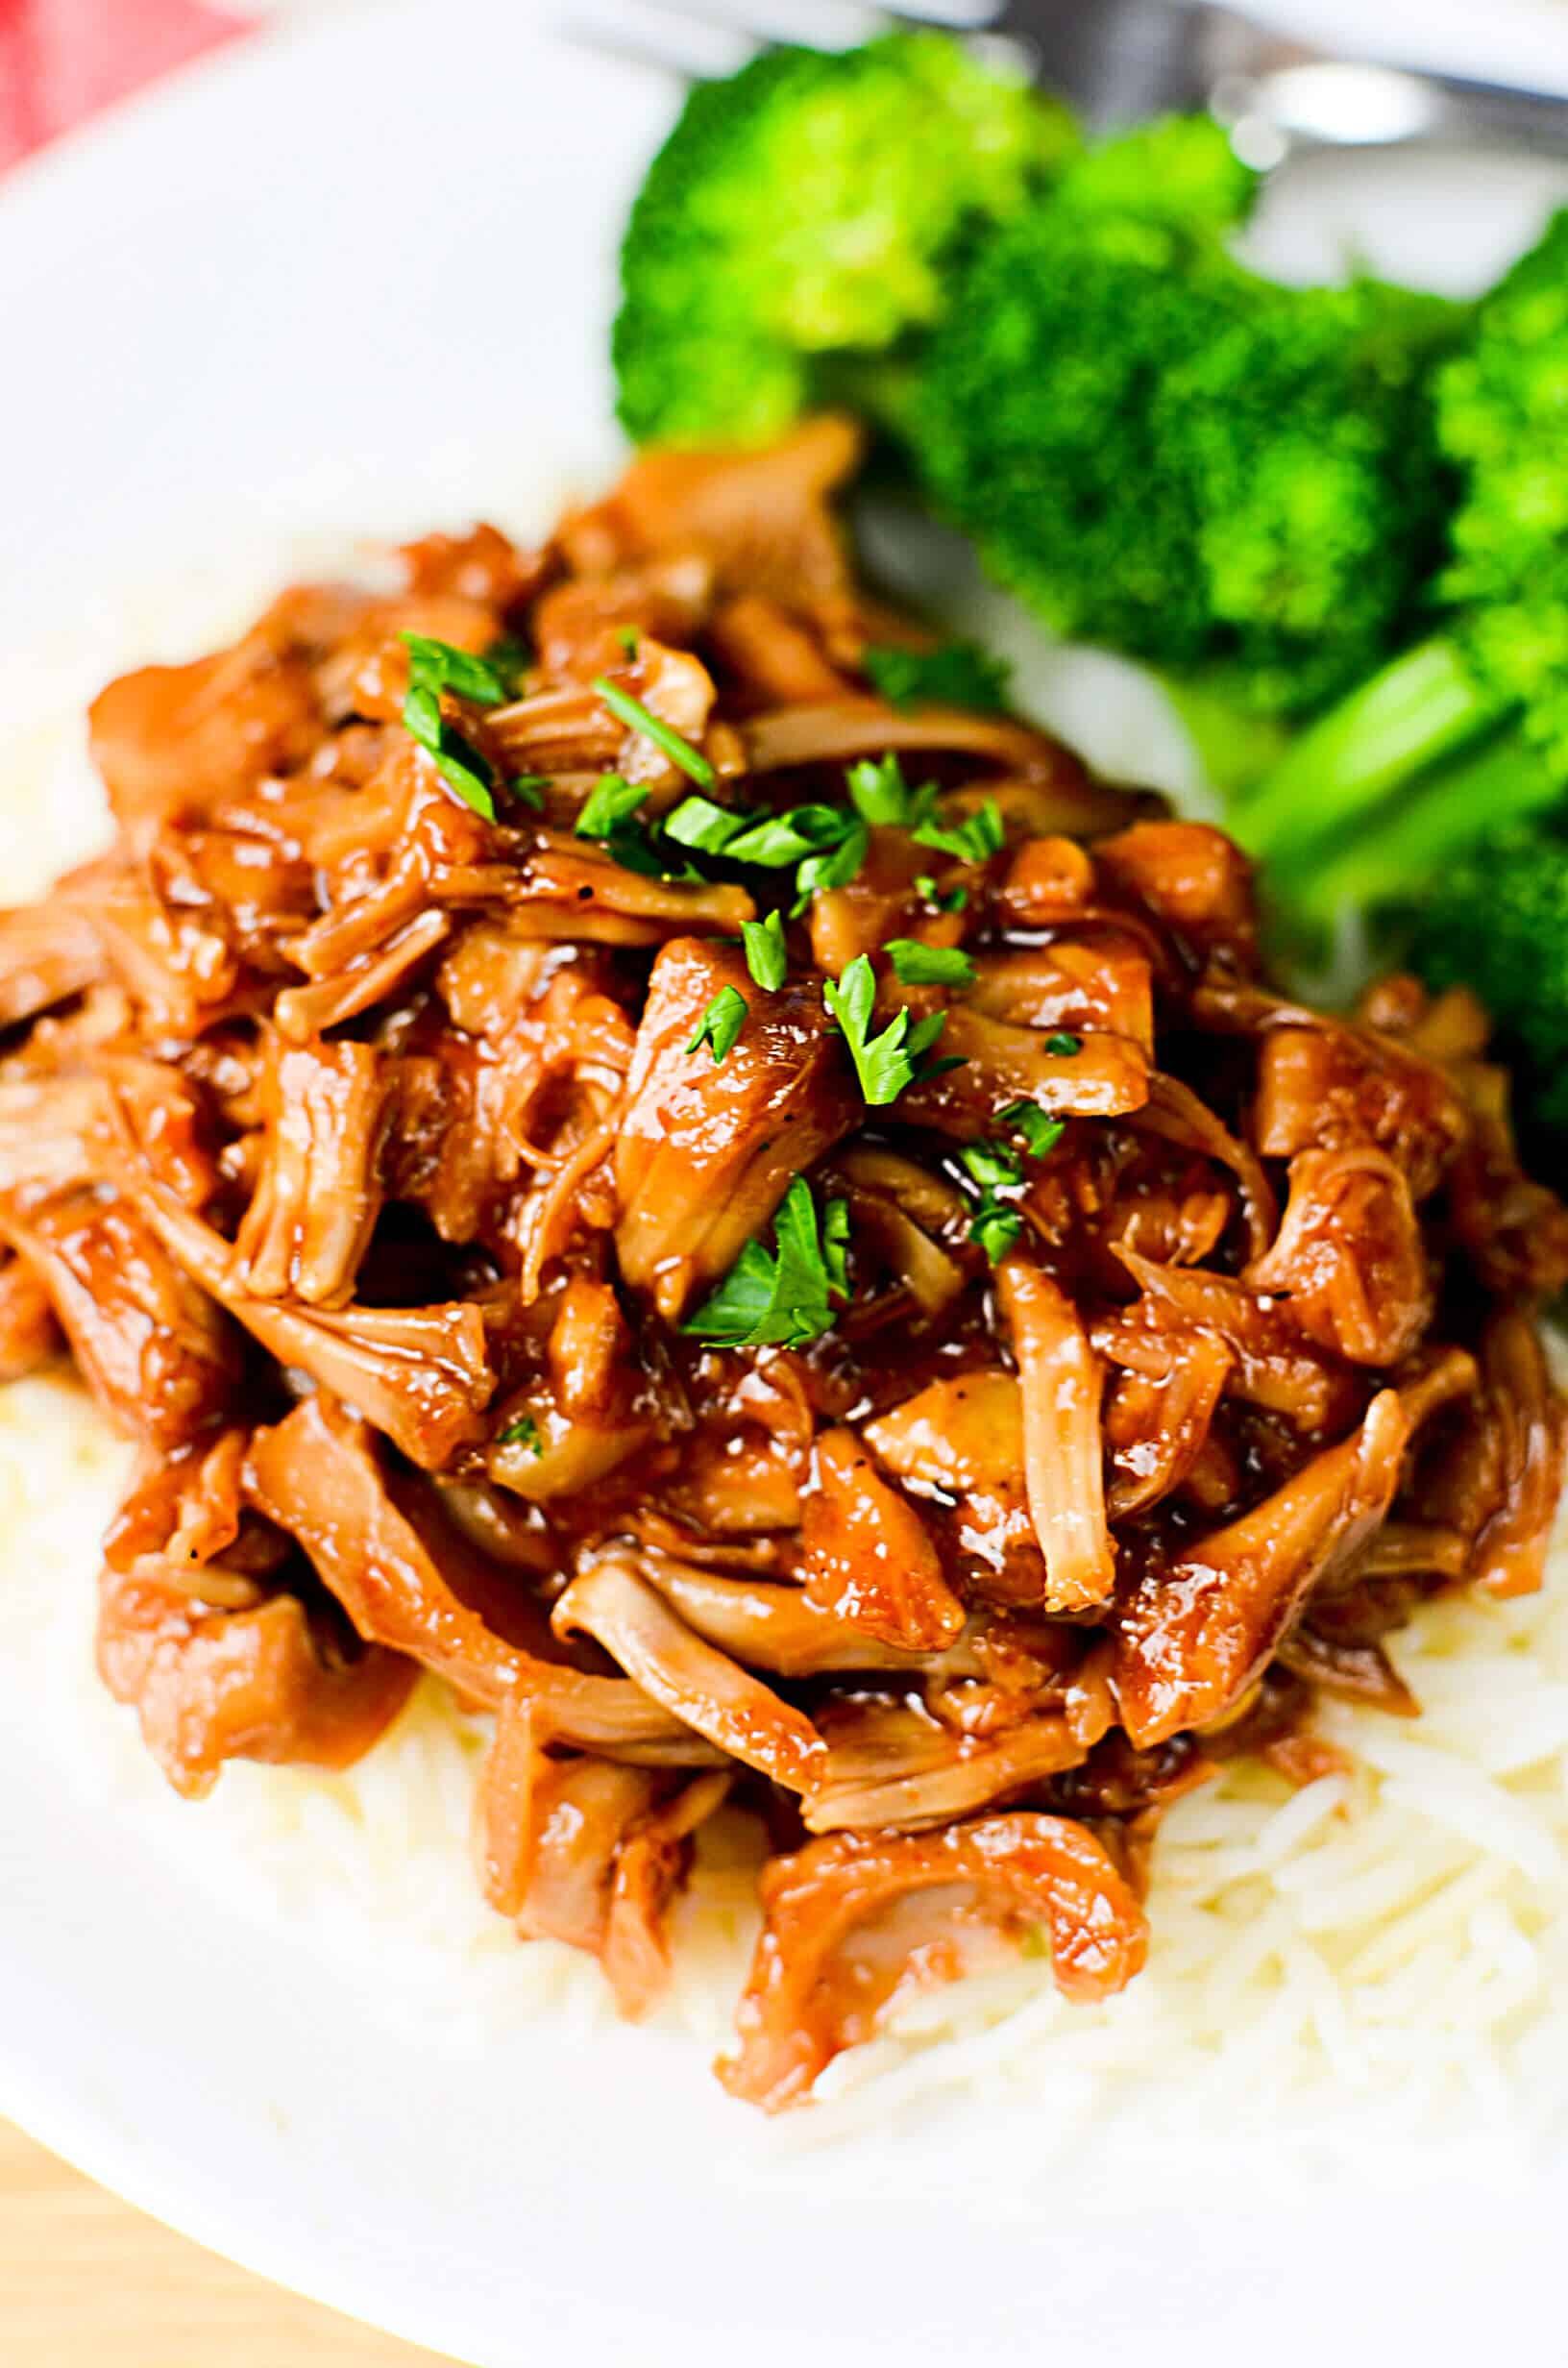
So when you have reached the desired crispiness that you’d prefer, be sure to check the temperature of the chicken at the thickest part of the breast, or between the leg and the body of the chicken. It should read 165 or so. It’s ok if the temp is a few degrees away because as it sits it will still continue to roast and come up to the desired temperature. Remove the chicken and basket from the unit and set aside. Cover with some foil to keep warm while you make the gravy.
FOODI ROAST CHICKEN: Making Gravy
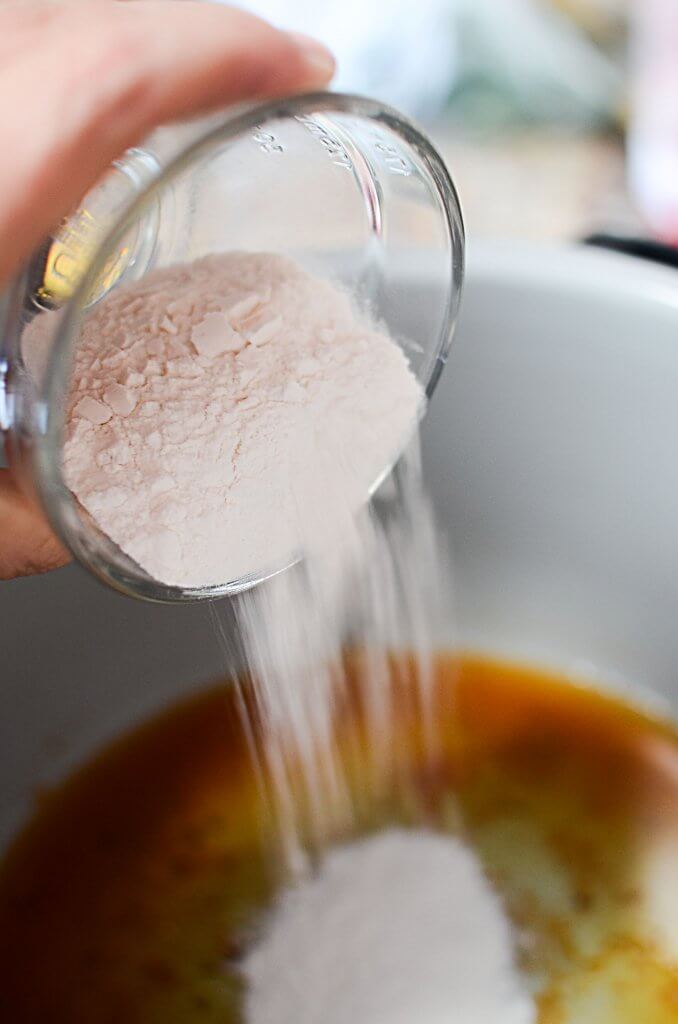
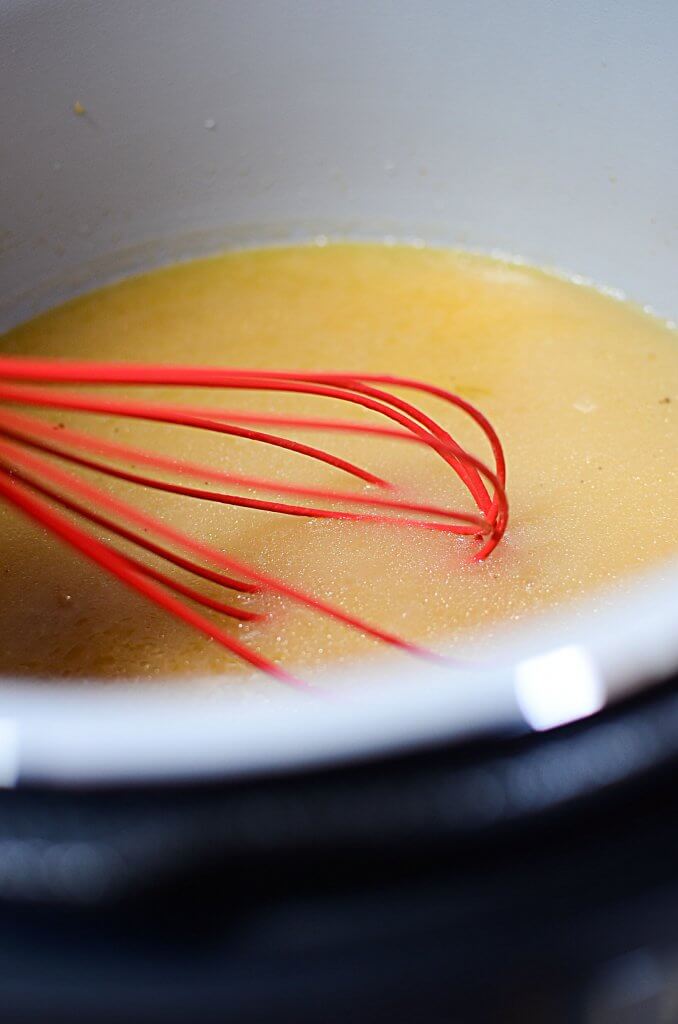
There should be some drippings in the main bowl of the unit. Cancel everything on the unit and then press saute. Add 2 tbsp of butter and the flour to the pot. Let the butter melt and then incorporate that into the flour. Continue to stir it around to “cook” the flour, and get a bit of color on the whole thing.
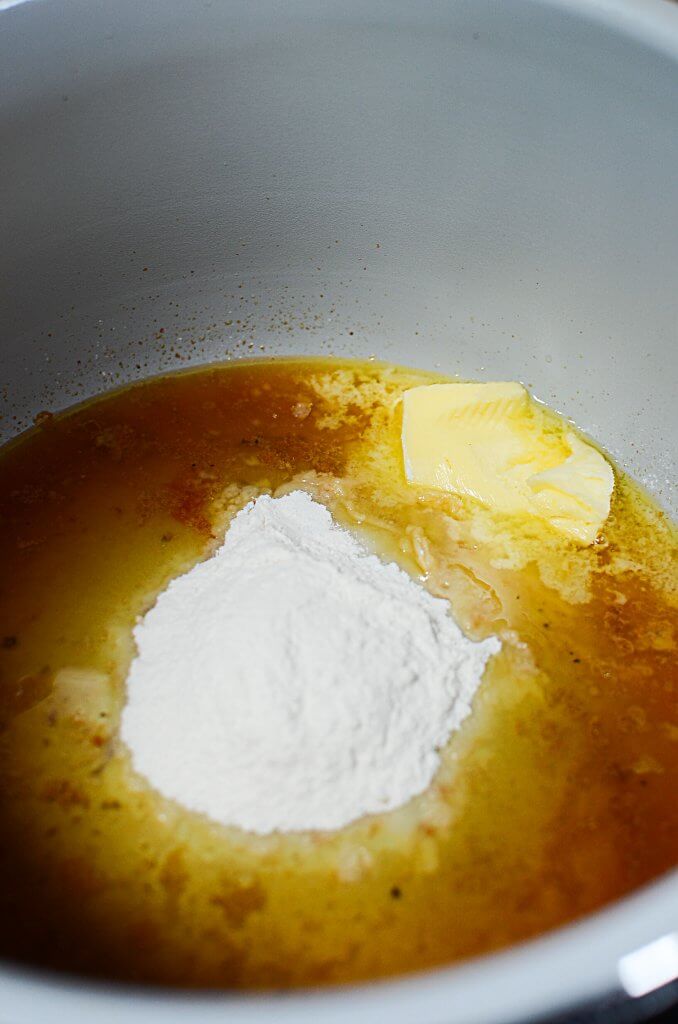
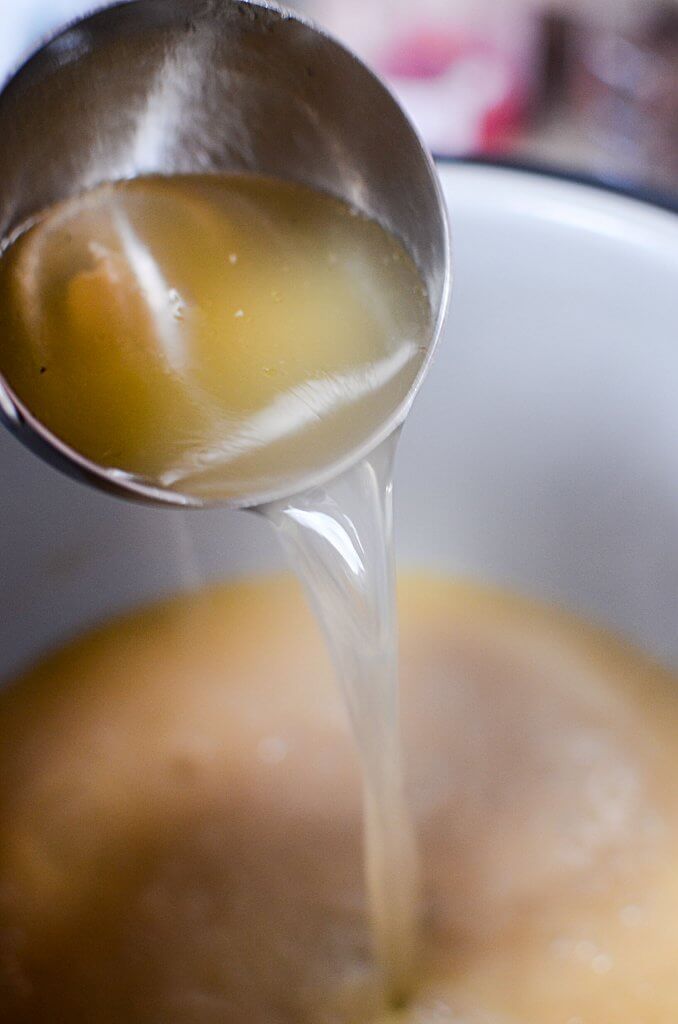
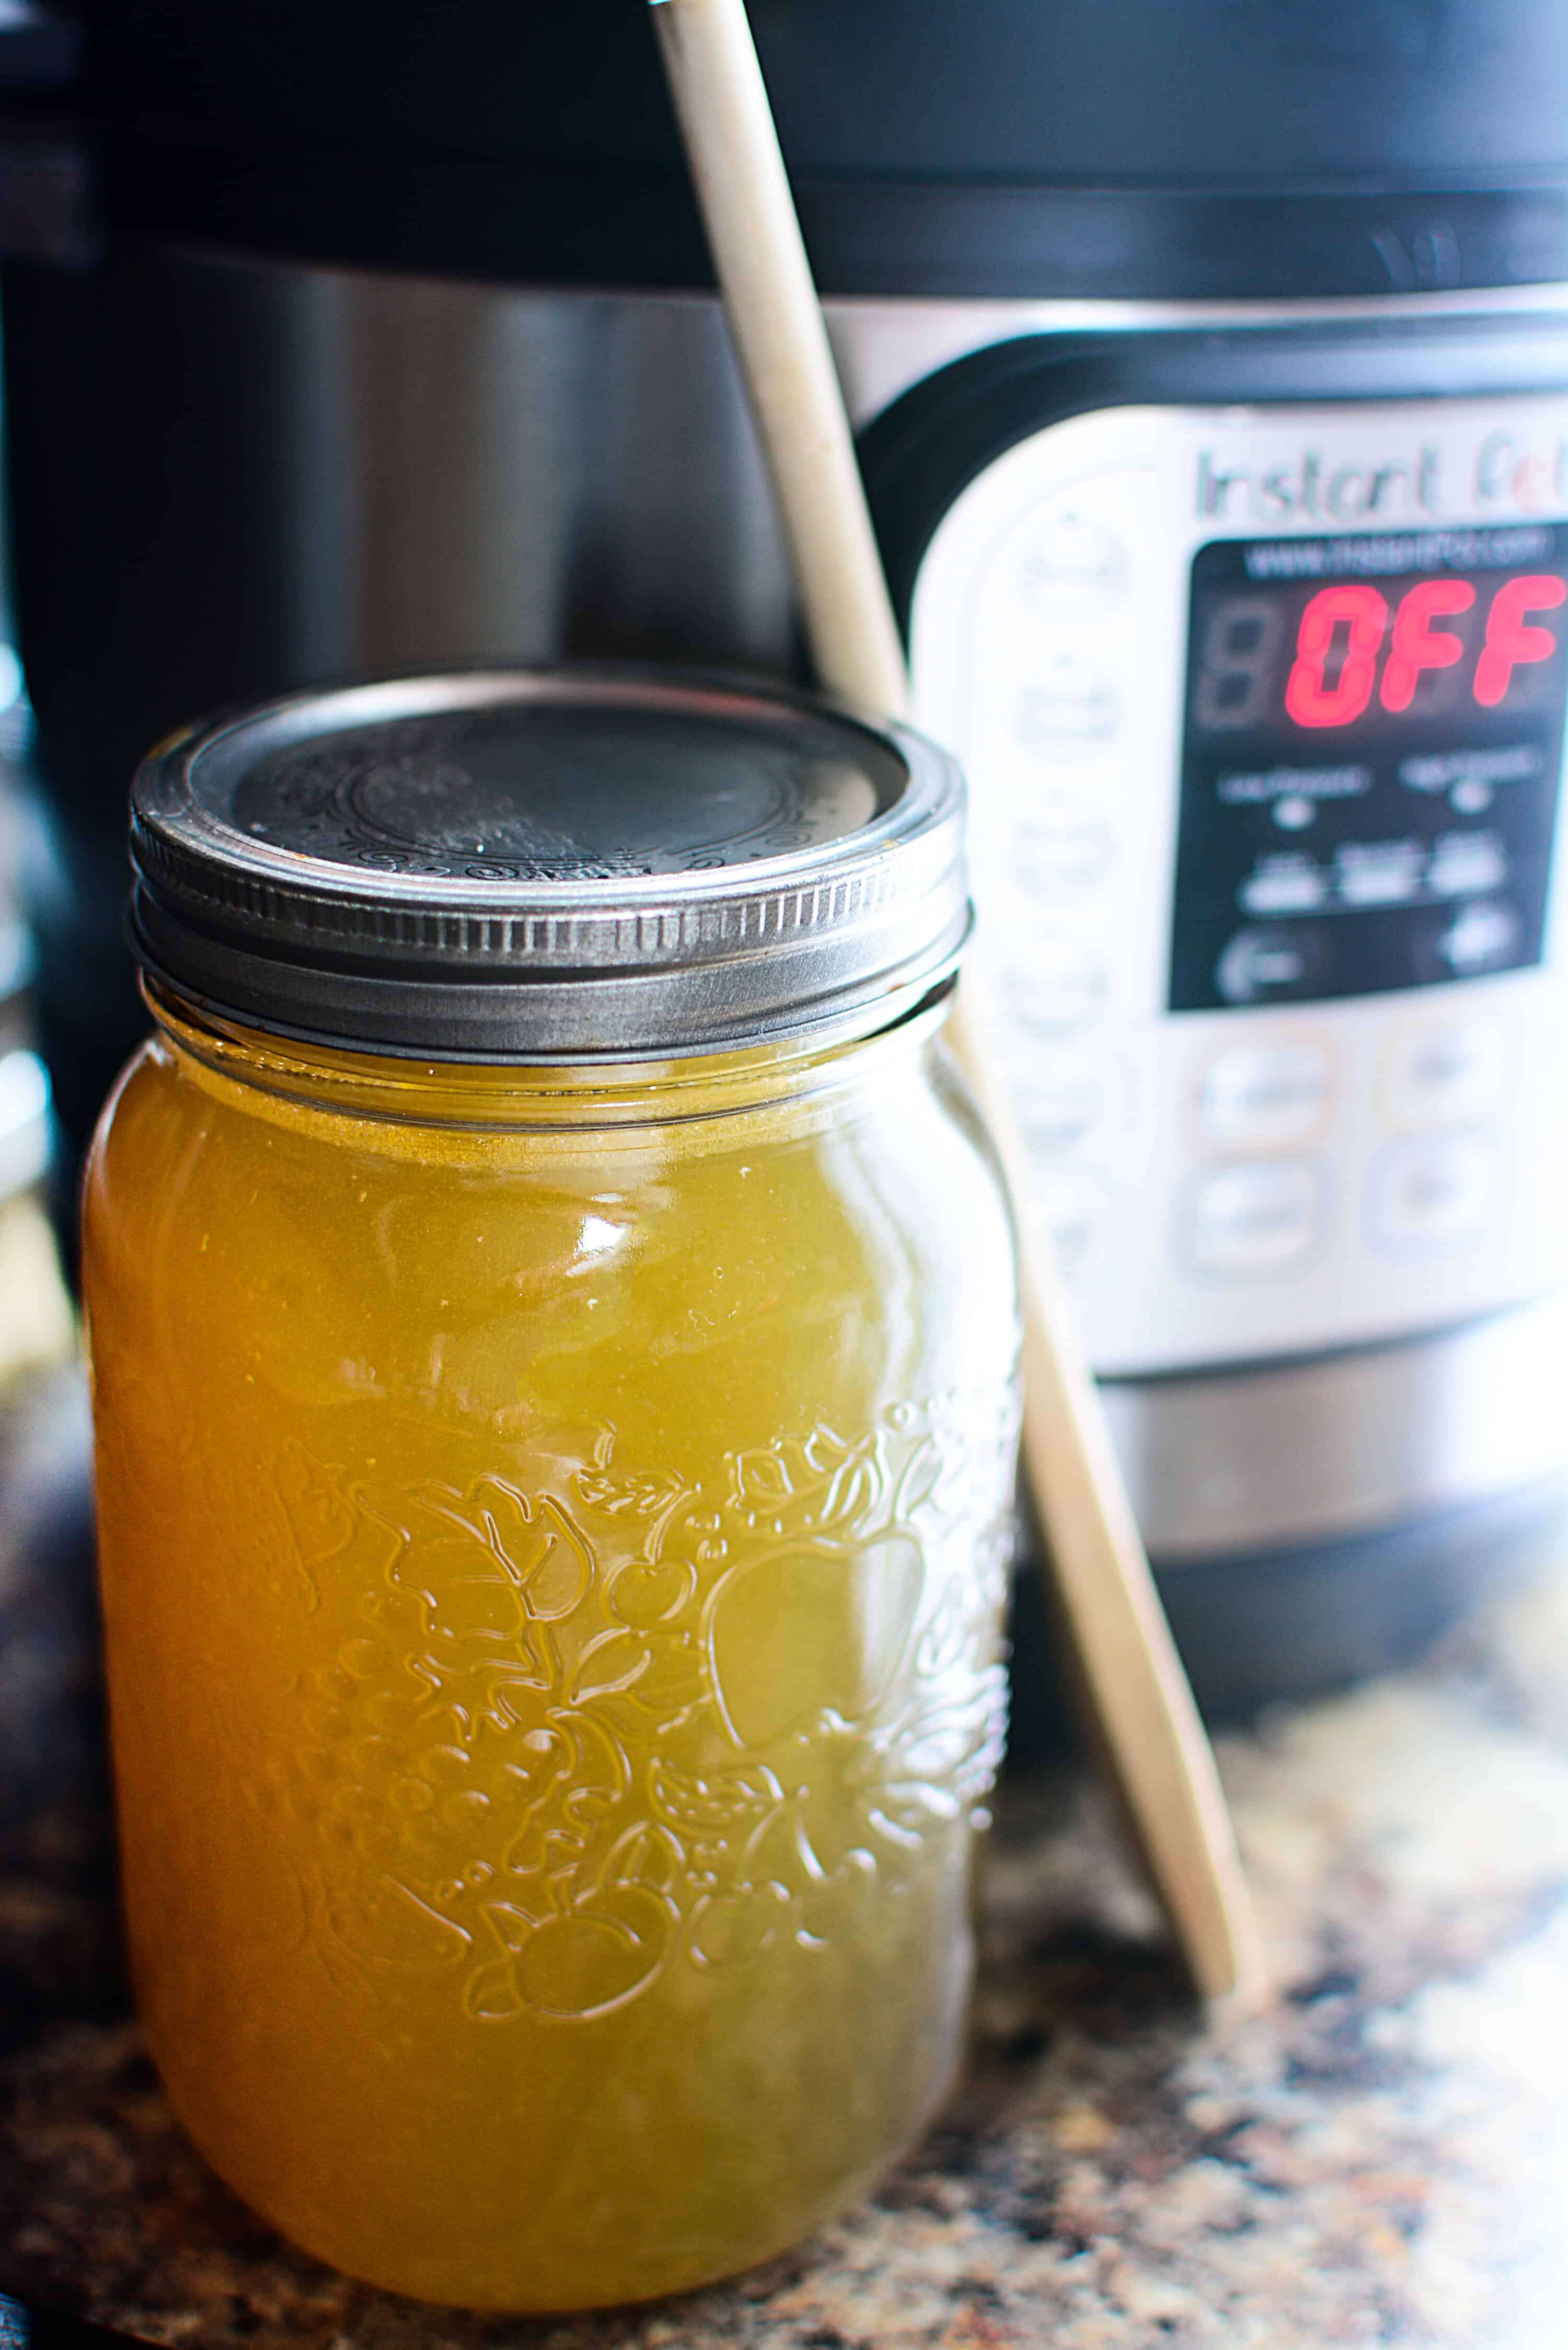
Add two cups of stock (commercial or homemade), one cup at a time. As the first cup thickens, add another cup and continue to cook that until it thickens as well.
I hope that you try cooking your own rotisserie type chicken in your Ninja Foodi, so you can see how easy it is to get stellar results with a minimum amount of effort!!
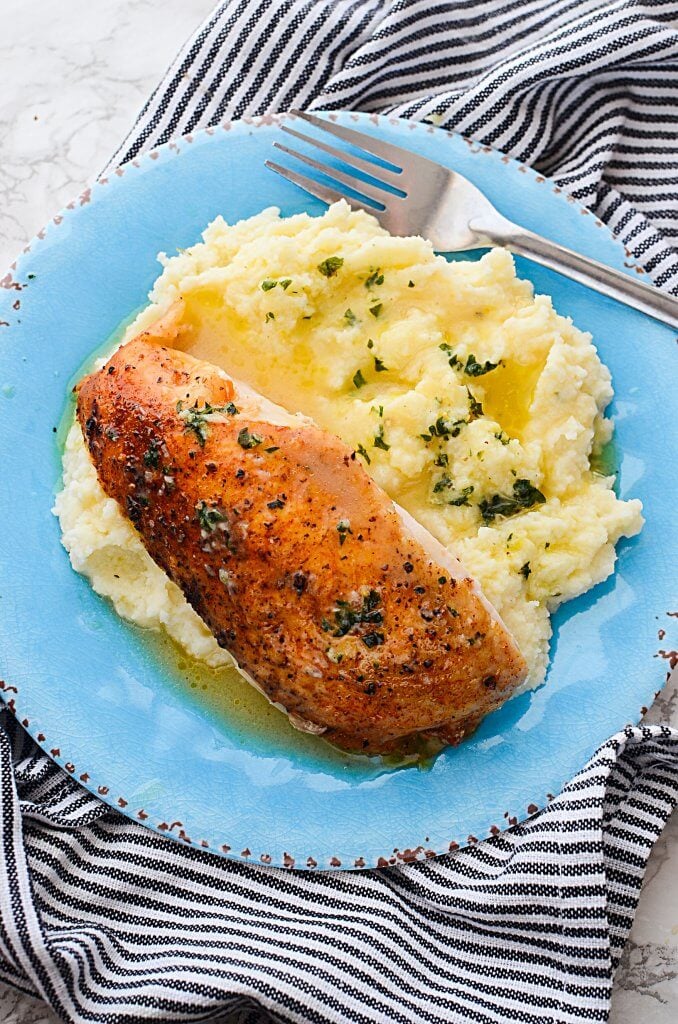
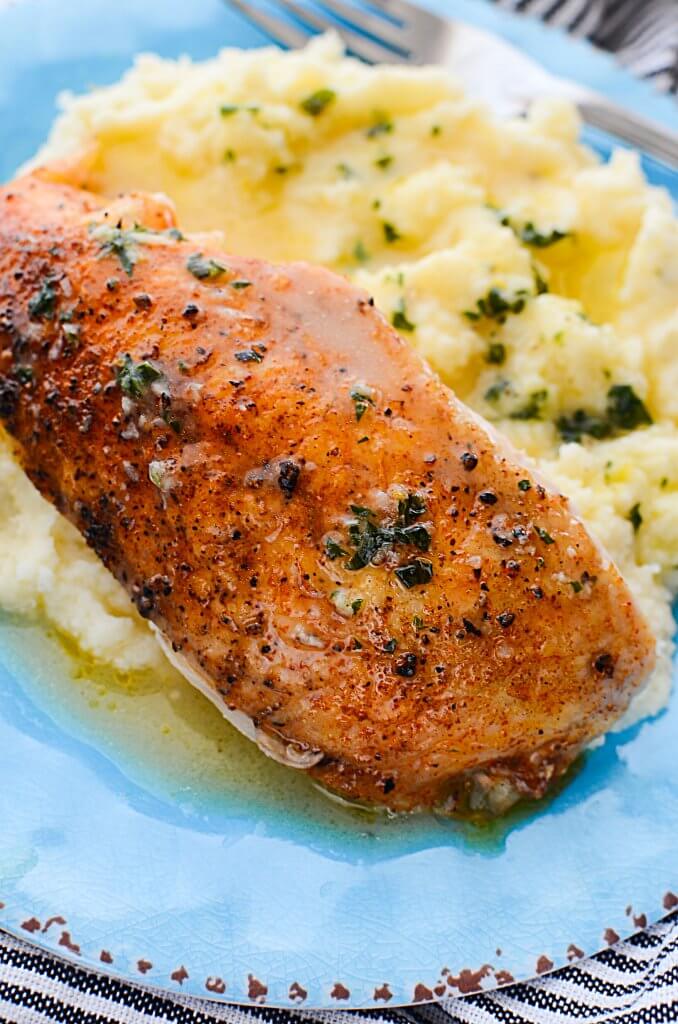
Serve the chicken with some yummy mashed potatoes or a really delicious recipe for 3 Minute Maple Carrots. Or, if you want a bit more decadence, try out this Brown Butter Parmesan Corn!
Foodi Roast Chicken will quickly become one of your “go-to” recipes for busy weeknights! Thank you for coming by The Salty Pot today! If you try this recipe, please leave a comment below and let me know what you thought of it!
Ninja Foodi Roast Chicken
This Ninja Foodi Roast Chicken has all things you love about Roast Chicken. Juicy inside, crispy top, and best of all, it's done all in ONE POT, and in LESS TIME than conventional oven roasting!!
Ingredients
- 1 whole chicken, (3.5 - 4 lbs)
- 1 cup water
- 2 drops liquid smoke
- as desired salt and pepper
- 2 tbsp butter
- 1 tsp paprika, (can used smoked paprika if you wish)
- 1 tsp garlic powder
- 1/2 tsp onion powder
- 1 tsp seasoned salt, (your favorite brand)
- as desired, pepper
- 1/4 cup flour
- 2 cup chicken stock
- *****For the Basting Butter:
- 2 tbsp butter
- dash of garlic powder
- as desired, seasoning salt and pepper
Instructions
- Pat the chicken dry with disposable paper towel. Season inside and out with seasoned salt, pepper, paprika, garlic and onion powders. Set inside the Air Frying basket.
- Mix the water and the liquid smoke together and pour into the main pot of the Foodi
- Place the chicken in the basket, inside the main pot of the Foodi
- Cook on high pressure for 15 minutes.
- When time is done, do a quick release, remove the chicken and the basket, and discard the water that was in the bottom of the Foodi bowl.
- Replace the chicken and the basket inside the Foodi liner and place the liner back into the unit.
- In a small bowl, melt the butter and make up the basting butter recipe above.
- Air crisp at 400 degrees for 15 minutes. Lifting the lid occasionally, basting the chicken with your basting butter to crisp/brown it to your desired color. Remove the chicken and the basket, and cover with tin foil to continue cooking to reach a 165 degree temperature reading.
- In the Foodi bowl, add the butter and flour to the drippings and press "saute". Mix everything together and slowly add the stock in small increments as it thickens. When all the liquid is added and thickened, you are ready to serve!
- Enjoy!
Notes
***Added information to this recipe ***
For the basting butter, you can make it as the recipe states, but I've sometimes added more ingredients like poultry seasoning, or Montreal steak spice.
Even adding some crushed chili peppers switches up the flavors and makes it a 'new' recipe after you've this roast chicken a few times. Don't skip out on the basting butter part of the recipe - it's highly recommended and makes the a huge difference in the flavors of the dish 🙂 Happy cooking!
Nutrition Information:
Yield: 4 Serving Size: 1/4 chickenAmount Per Serving: Calories: 539Total Fat: 33gSaturated Fat: 13gTrans Fat: 0gUnsaturated Fat: 17gCholesterol: 166mgSodium: 1016mgCarbohydrates: 12gFiber: 1gSugar: 2gProtein: 45g
** Don’t forget to PIN this NINJA FOODI ROAST CHICKEN to your favorite Pinterest board for later!! **

I know I may not get a reply in time but I’m gonna try anyway, haha. I have a 5.5lb chicken I want to cook, how long should I pressure cook and air crisp?
Hey Amanda! I’m sorry I didn’t see this earlier. How did it work out for you?
We have enjoyed this recipe several times and definitely a favourite…..so easy to make and YUMMY! Thanks Joanne. Don & Linda. Ontario Canada🇨🇦👍👍💕
Well thank you so much for the kind words Don! I am thrilled that you and Linda love the recipe. Your kinds words made my day!
I just followed this recipe for an almost 7lb bird. I adjusted the pressure cooker time to 25 min and they air fryer to 20 min and it was cooked perfectly! I also made the gravy and it was amazing.
Fantastic Kimberly! I’m so happy you liked the recipe 🙂
I can’t even get to the recipe bc of the absurd amount of ads that are making my phone move around sporadically. I really want to try this! But when I set my phone down to use my hands, inevitably the ads make the screen jump around. I’m not telling you to complain but only so that you are aware!!! I’m still going to try this once u manage to get to get it all written down
Hey Annie, so happy you are grateful for a free recipe that someone took the time to cook so you might be able to make it. If you don’t like the ads, I’m sure you will find that most online recipe sites have ads, also. I am grateful for this delicious recipe and I’m not complaining about the ads.
🙂 🙂 🙂
This recipe sounds delicious. How long should I pressure cook a 7 Lb. Chicken? Do I double the time. TIA
Hi Harry! I’ve never cooked a 7lb chicken in the Foodi before so I can’t say exactly how much longer it would need. I don’t think I would double the time, because you still have to crisp it after pressure cooking. I’d add probably 10 minutes onto the pressure cooking time and then be sure to take the temperature when it’s finished (before air crisping). As long as the chicken is at or slightly below 165 (remember it will cook a bit more during the air crisping time), you should be good to go. Let me know how it goes for you!
Came out great! But apparently I don’t know what “breast side up is” and cooked it flipped over. After I realized what happened, I just flipped it over and air fried for another 10 minutes to be sure it was done. [My digital thermometer was all over the place]. Moist and juicy even before the gravy’s added.
Thanks!
Yaaay!! I’m so happy to hear that the recipe worked out even with the mix up!! It’s a wonderful recipe to make in the Foodi. Thanks so much for commenting on your mishap, it teaches us all that it can still work out perfectly!
My family loves this recipe. Thanks for sharing. I do add avocado oil to the seasoning rub as my family likes it better. I substitute chipotle and water for liquid smoke.
Great recipe
Thank you for commenting Michele!
Yummy recipe! My family loved every bite. Thanks for sharing.
Wow-whee, I used this on a cornish hen with excellent results. I brined the chicken first for a few hours in a 5% saline solution. I added some herbs on the bird and did the 15 minutes pressure cook with 2 cups of chicken stock in the pot.
I followed that with 5 minutes of basting with seasoned ghee (can take high temps). Tested with a thermometer, and it was well over 165 internal temperature. Still moist and delicious. I normally DO NOT like chicken, but this was excellent.
Yaaay!! I’m so happy that it worked out for you SM!
I bought my foodi 2 years ago and have yet to use it. I bought a whole chicken yesterday and seasoned and stuffed it with boudin. I was planning to cook this on my pellet grill to get some good smoke, crispy skin and juicy meet, but thought about the air fryer that I’ve never used. I found your site and recipe and want to try it, but not sure if stuffed would come out the way I intend. Curious if the pressure cooking will make the boudin too mushy?
Thanks!
Hi AJ! Thanks for your question. Personally, I wouldn’t stuff the chicken with anything but some aromatics. I agree with you, it could possible turn out mushy. However.. if you decide to go ahead and try it, please comment again if you can and let me know how it went!
Is this the American recipe. I’m in England I have never heard of liquid smoke and my ninja only goes up to 200°
Hi Maxene
I just did a bit of checking, and liquid smoke is available at most grocery stores in the UK. Maybe just ask someone who works there to show you where it’s located. As for the temperature.. this recipe is written in Fahrenheit, not Celsius. I’ll make a note of that in the directions.
Don’t think I’ll do this one again. 15 min pressure cook, 15 min air fry, internal temp was 115. warped in foil air fried another 15 min and let it sit for 20 min in the foodie. Internal temp 162.
Hey Ron – Sorry to hear the recipe didn’t work for you. Do you know what size of chicken you started with? Was it particularly cold to start out with or had it just thawed from frozen? If you’d like to shoot me an email I’d be more than happy to go through things with you and help troubleshoot!
Hi Joanne,
I experienced the same problem Ron did in 2022. My chicken was a little larger than the recommended size (I didn’t check it closely enough). It weighed in at about 4.8 lbs. I cooked it according to the directions and could never get the temp to be over 152 degrees. This was even after crisping it for another 15 minutes. We ate a little bit of it and put the rest back in the Foodi on roast/bake to see if we could salvage it. I would probably pressure it for 30 minutes if I do it again. The flavor was good on what we could eat.
WELL-EXPLAINED step-by-step! Thank you
I recently bought the Ninja® Foodi® 11-in-1 6.5-qt Pro Pressure Cooker + Air Fryer. I contacted the Ninja company today and was told there is no Air Fryer Basket made for this model. An Air Fryer Plate came with my Foodi. I want to make this recipe but don’t know the best way to do it. What accessory would I use in pot instead of basket?
Hi Bonnie! I think what I would do is go ahead with the recipe and because you don’t have the basket, I’d put the chicken on a trivet and proceed as normal. If you give this a shot, or you tried a different method, I’d love to hear about it! You can shoot me an email and [email protected] .
My new foodie does not have the basket either, so giving the trivet a try. Love Rotisserie chicken so I am hoping for a perfect outcome.
Shouldn’t be a problem Becky! Give me a shout and let me know how it went!
Hi! I just tried the recipe and my foodi also does not have the basket. It was quite difficult to pull out the chicken and air crisp plate to remove the water below, before air crisping. I wonder if there’s a better way as there’s no handle to pull the air crisp plate out.
Hi Pris – I wonder if you use one of those silicone type hangers to rest the chicken on – that way you might be able to take it out to remove the water? I usually remove the water, but you could go ahead and try crisping the chicken with the water still in the bottom I think. If you try it or come up with something different, please let me know!
This was great!!!! my family loved it..
So delicious! Newbie Foodi so this recipe was perfect for learning the different techniques & ending up with a heck of a meal to boot. Thanks. PS I added a pinch of dried Italian seasoning and a light sprinkle of nutmeg to season the gravy. ✌😋
Thank you for this! Just tried it and I’m pretty nervous around a pressure cooker. I didn’t even know I could make gravy in my ninja so thank you for this. The times were on point. Thank you xx
Wooohooo! I’m SO HAPPY to hear that you tried the recipe Keisha! I’m glad it worked well for you, but the biggest thing about making the recipe is that it helped you feel a little less nervous working with the Foodi! Keep on going with it, the more you work with it, the easier it gets 😉
I made this last night and followed the recipe exactly. Turned out perfectly and ill be making again. Cant beat this for cooking a whole chicken in no time at all.
Thank you for trying out the recipe Juliette! I’m thrilled you like it!
Great recipe, thanks!
I used 1 tsp of kitchen bouquet instead of liquid smoke and vegeta as the seasoned salt. I also used 22 minutes for the pressure cooking and 20 minutes for the air crisp. This was my first time cooking a whole chicken so I wanted to be on the safe side just in case. It was a bit dry but now I’ll know for next time!
You’re very welcome, and I’m glad it worked out for you! 🙂
Great recipe! Thanks for sharing.
Total time on the recipe is a little misleading…need to account for pressuring time.
Hi Lisa, thanks for commenting! I think that most people who are using the Ninja Foodi (or any pressure cooker), already know that it takes time to come to pressure. I can’t account for how long that takes as people who live at different elevations all have different pressuring times. I’m so happy you enjoyed the recipe!! 🙂
Are you temperature fareinheight or celcius
Hi Linda 🙂 I always use Fahrenheit.
Just made this tonight, boys are eating right now, saying oh! so good! Great recipe, cooking and crisp is spot on!! Couples with mashed and your gravy, thanks!
Hi Juliie! Woohoo! I’m so happy to hear your family thinks this recipe is a keeper! 🙂
I just made this recipe and my family loved it. I use more liquid smoke than the recommended dose. I used about 19 drops and a cup of water which gave me one and a half cup of delicious chicken broth. Can I use this liquid to make the gravy? Is it safe to consume the liquid smoke? Thanks
Hi Eli – Thank you so much for commenting. This is an interesting question, and I did a bit of research on it. There are many commercially prepared foods that include liquid smoke as a flavoring but it’s difficult to know the amounts included as they usually don’t list those on the labels 🙂
I came across this article from Iowa State University regarding the use (and consumption) of liquid smoke. I’ll tag it here and then you can read take a read and then make your own decision as to whether to make gravy or not.
https://blogs.extension.iastate.edu/answerline/2019/04/18/liquid-smoke-that-controversial-condiment/
Thank you so much for sharing that article!
You’re more than welcome 🙂
Hi there. Thank you for this recipe. I have the Ninja Foodie, just as you have pictured but my sear/ saute option is not working. I made the recipe and ran in to some confusion on how to continue cooking the chicken after getting the drippings out. Can you please elaborate? Also, did I understand you correctly when you said take the chicken out of the basket and put it in the pot at this point? I tried to roast the chicken to no avail. The chicken was still pink inside. I am not sure that I did it right. The chicken was only 3 lbs. Thank you.
Hi Jenel. I’m sorry to hear that your sear/saute function isn’t working. Can you contact Ninja regarding this? The sear saute function is used to make the gravy portion of the recipe. As for the confusion, you pressure cook the chicken first, then dump out the water and put the chicken (while still in the basket) back in the unit. You make up the basting butter and then start air frying/air crisping the chicken and basting it. Then you remove it the whole chicken (still in the basket) and make a gravy using the saute function. I hope this helps!
Question. I’m making the gravy and recipe says to add butter and flour. But the butter I already used in basting chicken. How much butter do I add to make the gravy? Sorry I’m slow!
Hey Max! Thanks for asking! There’s the butter you used for the basting butter, and there’s also another 2 TBS that you use for making the gravy! I hope you love this recipe, if you do, let me know!
I’m new at using a Ninja Foodi. I just made this chicken, it is the easiest and best. Feels like thanksgiving with gravy too! Thank you. I will be sure to follow your site. Thank you
Thanks for the recipe!
Worth noting that you should never wash raw chicken – both the CDC and USDA say never to wash raw chicken as it seriously increases the risk of food poisoning from campybolacted
Campylobacter bacteria*
Sorry comment cut off! Cooking at appropriate temp will kill any bacteria 🙂
Cut-off before you research? The bacteria gets splattered around the kitchen while washing it. It’s not about the cooked chicken. So ready to jump down someone’s throat who is just trying to give a good safety tip is so 2020 of you. Chill out and say thanks! The author of this recipe did mention a slow drip when washing…
Thank you for this information. I find it very useful. I am no cook, so I often rely on recipes and most say to wash the chicken first. After reading your comment, I checked online and this is a thing. Thank you.
Manderz your response is so 2020 lol. The original comment about the CDC is correct. I’m old school and will continue to wash my chicken and bleach my kitchen however there’s no reason to jump on anyone for their comment that wasn’t made with an attitude
As a former Microbiologist please allow me to comment briefly. Abbrey is correct that the CDC does instruct consumers to not wash their chickens, but I think this misses the point of WHY. Personally, I wash my chicken always; however, I keep in mind the ways Campylobacter (and more commonly Salmonella or even Clostridium) can cause infections and take steps to avoid those issues.
The main point is that if you cook the chicken appropriately to the right temperature, Campylobacter will be killed IN THE CHICKEN; however, this still doesn’t prevent infection from another source — namely the liquid that comes off the infected chicken that contaminates other foods on the countertop, the cutting boards or matts, utensils, the sink or anywhere the liquid may touch. One drop of infected liquid dropping off the chicken can contain enough bacteria to contaminate other foods that come into contact with it that you may not cook or cook enough — e.g. using the same utensils or cutting matt to chop the salad. You could even be preparing other food (cutting it up e.g.) then placing it in the refrigerator. If it was contaminated with even a small amount of liquid, yes the bacteria can grow – more slowly at refrigerated temps, but still alive and growing.
So
I am not recommending anyone wash chickens, but the fact is that many whole chickens, even the best, have some accumulated liquid in them when you open the sealed package, and people like to wash that off before placing the chicken on the cutting matt. I wash it off as described because I am willing to take all the extra steps to ensure the extra dripping liquid doesn’t also contaminate other things. I open the bag and wash the chicken INSIDE one side of the sink being careful NOT to drop even one drop onto the countertop. Then I pat the chicken dry with disposable paper towels, in and out — then I place the chicken on the cutting matt. I then scrub my sink with Chlorox, leaving it on for about 10 minutes, and I wipe the matt and countertops with a dilute chlorox solution – wait – then wipe it off. Yep — lots of extra steps to avoid all just to “wash the chicken” but I just prefer it this way. Others not willing to take these extra precautionary steps should do exactly as CDC says – not wash the chicken but since it will drip some liquid anyway, just be aware that anything it touches should be cleaned thoroughly including simple utensils.
I have just made this chicken. Fantastic . Also I love your you tube videos. So helpful with great tips.
Thank you
Jane from West Yorkshire England
Thank you Jane!
Would I have to change anything if using a marinated, vacuum packed whole chicken?
Hi Holly – well, that’s a question! You know, I’m not even sure. I doubt the vacuum packing will have any bearing on the recipe and how it’s made… but the marinade might. Of course, the flavor will be different if the marinade has seasonings in it, but if it’s a marinade used strictly to encourage extra moisture in the meat, (like a brine), then you would want to cut down the cooking time. I’ve never done this, so it would be a guess on my part.
If it were me, I would PC for 12 minutes, and then continue on with the crisping portion – however, be sure to have a thermometer ready to check the temp of the bird. Cutting back on the crisping time might make for soft skin so I personally cut back on the p/c time. The most important is that the bird is cooked to 165F. I hope this helps!
This was the first thing I made. Followed your directions and everything turned out so delish. Thanks.
Yaaaay Kelly, I’m happy to hear that!!
Can you cook a whole chicken from frozen?
Hi Teonia! Ok, so I’ve never done it to be honest, but it’s possible with a few conditions. A. – Be sure there is no giblets or a neck inside the chicken. B. – You might want to add an extra few minutes (5min per lb) onto the pressure cooking time to cook it from frozen (considering it’s the same size as the one I use in the recipe). C. – Keep in mind that the pot will take a lot longer to come to pressure to begin cooking because the chicken is frozen.
I used your advice and didn’t cook the chicken like the recipe with the ninja foodie said. Your recipe was great. Crispy and not dried out. Got it for my family and this was my first chicken. But not my last. Thanks
Beryl, I’m thrilled that you enjoyed the recipe!! You made my day!
I think I must take time to leave my comment here. I follow you step by step and it came out so great, so delicious! My family love it much and make me so happy! Thank you for this post. Keep sharing!
My chicken was about 4.7 lbs.. added time to both pressure and air crisp on Foodi Ninja.. was not enough.
I had to put in the oven and finish… That being said.. the gravy turned out well…and the spices worked well,.
I’ve had this experience before w the instantpot when the ckn i had was larger than the recommended upper limit. I think the bird is mb too packed in for the interior to be fully cooked in a reasonable amt of time. 4.7 lbs sounds large…mb try it w a smaller ckn?
Hi Susan, Thanks for commenting.
Yes, I agree. It’s not that it can’t be done in the Foodi, but I think I’d cook it using a different method than the way I’ve laid it out in this post. I agree with you, it would be more time to cook an almost 5-pound chicken, most definitely.
Just made this tonight!!! SO delicious!!! Thank you very much for this recipe!
Hi Genee!! You are SO welcome and I want to thank you for taking the time to comment!
Love this recipe! We got our foodi about a year ago and I’m making the roast chicken at this moment, think I’m into double figures now as it’s so good. I’ve never had any issues with the temp once complete but I’m using the meat thermometer in the ’15 in 1′. Internal temp of 75 (C, F would be 165) and it’s perfect every time.
Just made this tonight, which was day 3 of owning the 6.5 quart Ninja Foodi. All I can say is “Bravo!” This recipe worked perfectly! My chicken was about 4 pounds, and I ended up needing about 20 minutes of air frying. That skin was so crispy and brown and beautiful. I LOVED making the gravy out of the drippings, too! It felt like Thanksgiving today. I had also made mashed potatoes (in the Foodi, of course) and rice pudding (again, the Foodi). So a triple play Foodi day for me, but these tips on the chicken were spot on. The chicken was moist and delicious with that crispy brown skin. I did use chicken broth in the pressure cooking phase so that probably helped add flavor as well, but I’m sure it would have been just as good with water and liquid smoke. Thank you for this and your series of recipes!
Wooohooo Michael!!! I’m SO thrilled to hear that you loved the recipe!! You totally made my day!! Thank you for taking the time to comment 🙂
This looks good and I am planning on trying it this weekend. I am wondering about including small roasted potatoes in the basket with the chicken. Have you done that and how much longer would I need to add to the pc time? Thank you.
Hi Karen! So I haven’t tried it as of yet. However, I don’t think you’d have to add any extra time to the pc time. I think if you look through the comments, there are others who have tried this.
Let me know how it works for you!!
Best roast chicken recipe for the ninja hands down! I have tried a few over the last year or so and this one is the best. My family loved it including my picky 2 year old daughter.
Thank you!!
Lovely – turned out great
Yaaay that’s awesome to hear! Thank you Mo!
Just purchased the Ninja and my first attempt went well! Super juicy and oh so tasty! I made mashed potatoes from scratch and broccoli with lemon and garlic.
WOWZA!
Woohoooo!!!! That’s awesome to hear Diana!! I think there’s very little things on this earth that are better than homemade mashed potatoes!! I’m thrilled to hear the recipe went well for you!!
I’m new to the Ninja foodi and absolutely love it. My husband wanted me to try a roasted chicken and I found your recipe. I followed it exactly and it came out perfect. Thank you.
Dorinda. I would love to post a picture but dont know how. It was picture perfect. Lol
Hi Dorinda! That’s so incredibly awesome that you loved the recipe!! I *think* there is a way for you to upload a photo if you rate the recipe? I”m not 100% sure. BUT.. if that doesn’t work for you, by all means, shoot me an email with the photo and I’ll post it on my facebook page!!
You can email me at [email protected] .. I hope to see your pic!!!
I made this last night and followed your recipe exactly. It was SO GOOD!! I can’t wait to make this again! Thanks for sharing this recipe!!
Thank you SO much for taking the time to comment Dawn!! I’m so happy that you enjoyed the recipe!! 🙂
Thanks again Joanne for sharing!! I’m making again right now 😋 We LOVE this!!
Wooohooo!! Yaay!! Thank you SO much Dawn for your kind words! I’m SO happy that you love the recipe!!!! Wow.. you just made my day! 🙂
Can you stuff the chicken to cook in the foodie?
Hey Traci,
Personally, I would not stuff the chicken for this recipe. Unless you’re adding in some aromatics such as lemon, rosemary or thyme, and maybe some onion, but that’s about it. I just don’t know how the stuffing would react under the pressure cooking time as well as I’d be concerned about the chicken reaching safe cooking temperatures internally.
Lastly, I LOVE stuffing that’s kinda crispy from being roasted in the oven, so I wouldn’t want to miss out on all that crunchiness.. lol!
Can this recipe be used on just drumsticks
I think I would just find a different recipe specifically for the drumsticks, Robert. They would require a different cooking time, and I don’t know if you were still planning on making a gravy for them? It’s something I’ve never done, but I think I might have to!!! Thank you for the inspiration!!
I often do long grain rice and drumsticks or breasts I use the pressure cooker lid for 7 mins let stand for 5 mins and then the crisper for 15 mins it all tastes awesome and you can do it the same without rice or warm time. I also do fried chicken with coating ohhh so good
How do you run the inside with spices, inside the cavity or under the skin?
I season the inside of the cavity. However..you could mix a bit if butter with the seasonings of your choice and slide that under the skin as well. The butter will melt during the PC time and help keep the meat moist!
I made a 7.5 pound chicken for 25 min pressure. 15 crisp. Still raw. It was to squished in the pan. I’m putting in for 10 more pressure on rack. Wish me luck
For a chicken that large you would need the 8 Quart Ninja Foodi.
If you use the 8 quart Ninja Foodi and use a 6-7 pound chicken, how would you modify the time?
Made this tonight…it was delicious! only modifications I made…I stuffed the cavity of the chicken with a lemon, whole garlic cloves, shallot, and poultry herbs. I also added poultry seasoning to the gravy. Everything else was per the recipe. Chicken turned out perfect!! Thanks!
I cooked a whole chicken for the first time in my Foodie and the chicken split right down the middle. Is there a way to prevent that from happening?
I’ve never heard of that happening, so I’m not sure why or how to advise you on preventing it. When you cook a chicken again, I’d love to hear if it happens a second time. Maybe it was just that particular chicken you used?
Mine did the same thing!
Organic-air cooled 4lb chicken
Followed the directions to a “t”
🤷🏻♀️🤦🏻♀️
The time that happened to me (first time I used the Foodi to cook a bird) it was because I didn’t tie the legs together. Got some butcher’s twine and tied the legs on #2 and MOSTLY followed this recipe. Temp was 20 degrees too cool (145) after prescribed 15 + 15, so I gave it another 5 in the air crisp. Got the temp up and didn’t hurt the bird (BEST I’ve ever cooked) but if I’m going to add 5 minutes I think I’d rather add it to the pressure side rather than the air-crisp side.
Also…you’re throwing away a bunch of chicken goodness when you discard the juices. I was concerned that they arrived before the bird was up to safe temp BUT if you boil those juices (destroys any lingering bacteria) and add them before stock to the gravy the results are delightful.
Also…the first time I followed Ninja Culinary’s recipe and I LOVE yours. They have you season the water and I was thinking “WHY?” but figured as a newbie user mine was not to reason why. One other thing: Conventional wisdom was to wash chickens – but the current thinking is that it’s more dangerous to wash than just to let any surface bacteria cook out which it will. The new rule of thumb – stated on many websites – is that you spread bacteria unintentionally by washing poultry in your kitchen, contaminating areas that you think are safe.
I too hated to throw out all those good juices. Next time I will use it to make gravy minus the liquid smoke.
The flavor was really good and I was excited to try it. The chicken gets soggy when you cover it with aluminum foil. I was excited to try the crispy part but it just gets soft when you cover it. I’ll try again minus the foil!
Made this tonight, and my chicken loathing hubby loved it. That gravy was silky and flavorful. Will make again, and again.
Thank you for posting. I made this today with a few seasoning differences, but it looks and tastes amazing.
Thanks for commenting Kristi!! I’m so happy you enjoyed it! How did you switch up the seasoning, if you don’t mind me asking? Maybe others who read this will enjoy your seasoning as well 🙂
We made your recipe in our 6,5 foodie used a 4.5 lb chicken and pc for 20 minutes it was fantastic thanks for the recipe
I’m glad that you enjoyed it!!
Hi. I have the 8 qt 9in 1 Foodi this was my first meal using this type of appliance. I used a 3.75 lb organic chicken. It came out very tender but a bit under cooked by the legs and was hoping for it to be more crispy. I think next time I may add 5 minutes to the pressure cooking and 5-7 minutes to the air crisper? Thoughts? Otherwise it was excellent! So tender. Amazing.
Thanks!
Hi Katherine, I’m happy that you’re first meal was the roast chicken!! As for adding more pc time, I think I would only add 2 minutes to start with and go from there. The air crisping is really up to your own preference, depending on how crispy you like the skin.
You’re so welcome and if you cook any other of my recipes, I’d love to hear about them as well!
Hi, I do not know that you’ll get this message in time, but I decided to try anyways. I am about to make your whole chicken recipe, however I just realize that I am completely out of liquid smoke. What do you suggest to use instead?
Thank you
Hi Laura! It’s totally fine if you don’t have the liquid smoke. The bird will still be super delicious! I hope it all turned out well for you if you already made it!
We used our Foodi for the 1st time. We did the roast chicken recipe. We used 1/4 cup lemon juice, 1/4 cup honey and 1/4 cup water as the recipe says. About 5 minutes into cooking we got the “water” message on the display. Checked the troubleshoot section of the booklet which said the water was low. We added another 1/2 cup of water to the pot, which was completely dry at this time and restarted the process. In addition to the listed ingredients for the recipe should extra water be added before starting?
Hi Debbie! Thanks for commenting 🙂 So, which recipe were you using, because my recipe doesn’t call for the use of honey or lemon juice. Regardless, you almost always need 1 cup of liquid for the pot to come to pressure and do its thing. When you added the extra cup of water, was the honey still there?
Hi. Thanks for your quick reply. I used the recipe that is in the booklet that comes with the unit. So if the recipe calls for 1/4 cup of hot water, 1/4 cup of lemon juice and 1/4 cup of honey I still need to add an additional 1/2 cup of water for a total of 1 1/4 cups of liquids? And no when I added the additional water there was no liquid left in the pot.
Honestly, Debbie, that booklet that came with the foodi has some SERIOUS issues. (Don’t try and make the macaroni!!! ugh!). I’m wondering actually if perhaps you didn’t have the valve turned to seal? Because even with 3/4 c of liquid in which you started out with, it should have been enough for the Foodi to come to pressure.
Have you tried the recipe again since writing in?
Water boils at a lower temp with higher altitudes. Maybe that could be an issue. I have found with mine, a minimum of a cup of any liquid is needed. I have found that many of the ingredients in the recipes that come with the Foodi are a bit off. I only use my book to get ideas and an approximation of cook time. By the way, this recipe is very similar to mine. All the same ingredients except I inject mine with Cajun garlic butter and I use beer instead of water. Great recipe.
Joanne —
It MUST have serious issues! I tried the recipe from the booklet for my first Ninja Foodi attempt and it was a disaster. I had a 3lb chicken, pressure cook for 20 minutes on LOW per the instructions and it wasn’t even close to done!! (I have the Foodi Compact model).
I will try YOUR recipe and instructions next time!
I followed the directions exact , but the chicken was not done and we were already to eat with potatoes and everything. A little disappointed, threw it back in pressure cooker for another 10 mins
Hey Rick! I’m sorry to hear that your chicken was underdone. I tested this recipe using 4lb chicken, what was the weight of the chicken you used?
I have the Foodi 8 qt and I have done several 7 lb chickens in it. I use the recipe that came with my pot which calls for 1/4 c lemon juice, 1/4 c honey, 1/4 cup hot water, 2 tbsp kosher salt, 5 sprigs of fresh thyme, 5 cloves of garlic smashed, and 2 tsp whole peppercorns. Put all that in the pot then put the chicken in the air crisping basket on top of the ingredients and pressure for 23 minutes then crisp for 30 min. Wonderful chicken! You can use the same recipe for the smaller Foodi as well, just adjust your pressure and crisping for your 4-5 lb chicken as was shown in this article. Thank you for the information and recipe, I was needing the times for a smaller chicken tonight!! Warmest regards, LuAnn
I am dying to try this! It looks so good!
I have a 6.5 qt Foodi and when I tried a 5.75 lb chicken for the Foodi roast chicken recipe, at 30 mins instead of 22 (that were called for the 4.5-5 lbs), followed by 20 mins of tender crisp, it turned out undercooked! How long do you recommend I do a 5.75 lb chicken for? Or should I not do one that big?? I want this to work!
Thanks!
Hi Angelica!!
I’m really interested in helping you troubleshoot this issue. Can you direct message me on The Salty Pot facebook page so we can discuss this? I’m not sure why it was taking so long for you, but I want to help! Please give me a shout and we can go over a few questions, and figure it out! 🙂
~Joanne
Hi Joanne,
I have the same issue as Angelica can you share your ideas with me too please.
Thank you.
Hi Roberto,
As it’s difficult for me to help without getting more information, I’d like to ask you (as I asked Angelica) to msg me on The Salty Pot facebook page so I could get more of an idea of what’s going on. Thanks and see you there!
Ninja Foodi….or the new Ninfa Foodi Grill???
In the Ninja Foodi, my friend! It’s awesome!
Can you share what size foodi you did this chicken in? I’m interested in the 5qt and it lists it can cook a 4lb chicken. Wondering if this is the size foodi you’ve used? Many thanks. G.
Your recipe omitted when to add the paprika! Thanks
Hi Sarah! Thanks for the heads up! I revised the recipe! 🙂
I just got my Foodi and this is my first meal. My chicken is frozen – how long would you recommend on the pressure cooking phase? TIA!
Hi Katie!
I’m sorry to be a day late to respond to this! I’ve never cooked a chicken from frozen in the foodi yet. Did you do it? How did it turn out? I’d love to hear about it!
Don’t cook a frozen chicken in it. I tried that the first time and everything on the outside was cooked. The inside of the chicken was still raw and frozen.
I used our Foodi for the first time last night with this recipe (mostly). My biggest problem was finding a non-frozen chicken as small as called for in the recipe. Without going to a different store (didn’t really have time), the smallest I found was 5.7 pounds. Then it really didn’t fit in my 5 quart Foodi as intended – the top of the chicken was touching the top of both lids which is not supposed to happen. I pressure cooked for 20 minutes and air fried for another 15 or 20 (can’t remember). It was not undercooked and everyone loved it but next time I hope to find a smaller chicken.
I didn’t have liquid smoke so I used 1/2 cup chicken stock and 1/2 cup water in the bottom with some chipotle seasoning and smoked salt as a substitute. I also stuffed the cavity with a pierced whole lemon and garlic cloves as someone else suggested (the whole garlic cloves were super tasty too!). Otherwise, I followed the recipe – although I didn’t measure the spices – just estimated. Also thinking of trying this with bone-in chicken breasts sitting on top of thick lemon slices – I bet that would turn out great!