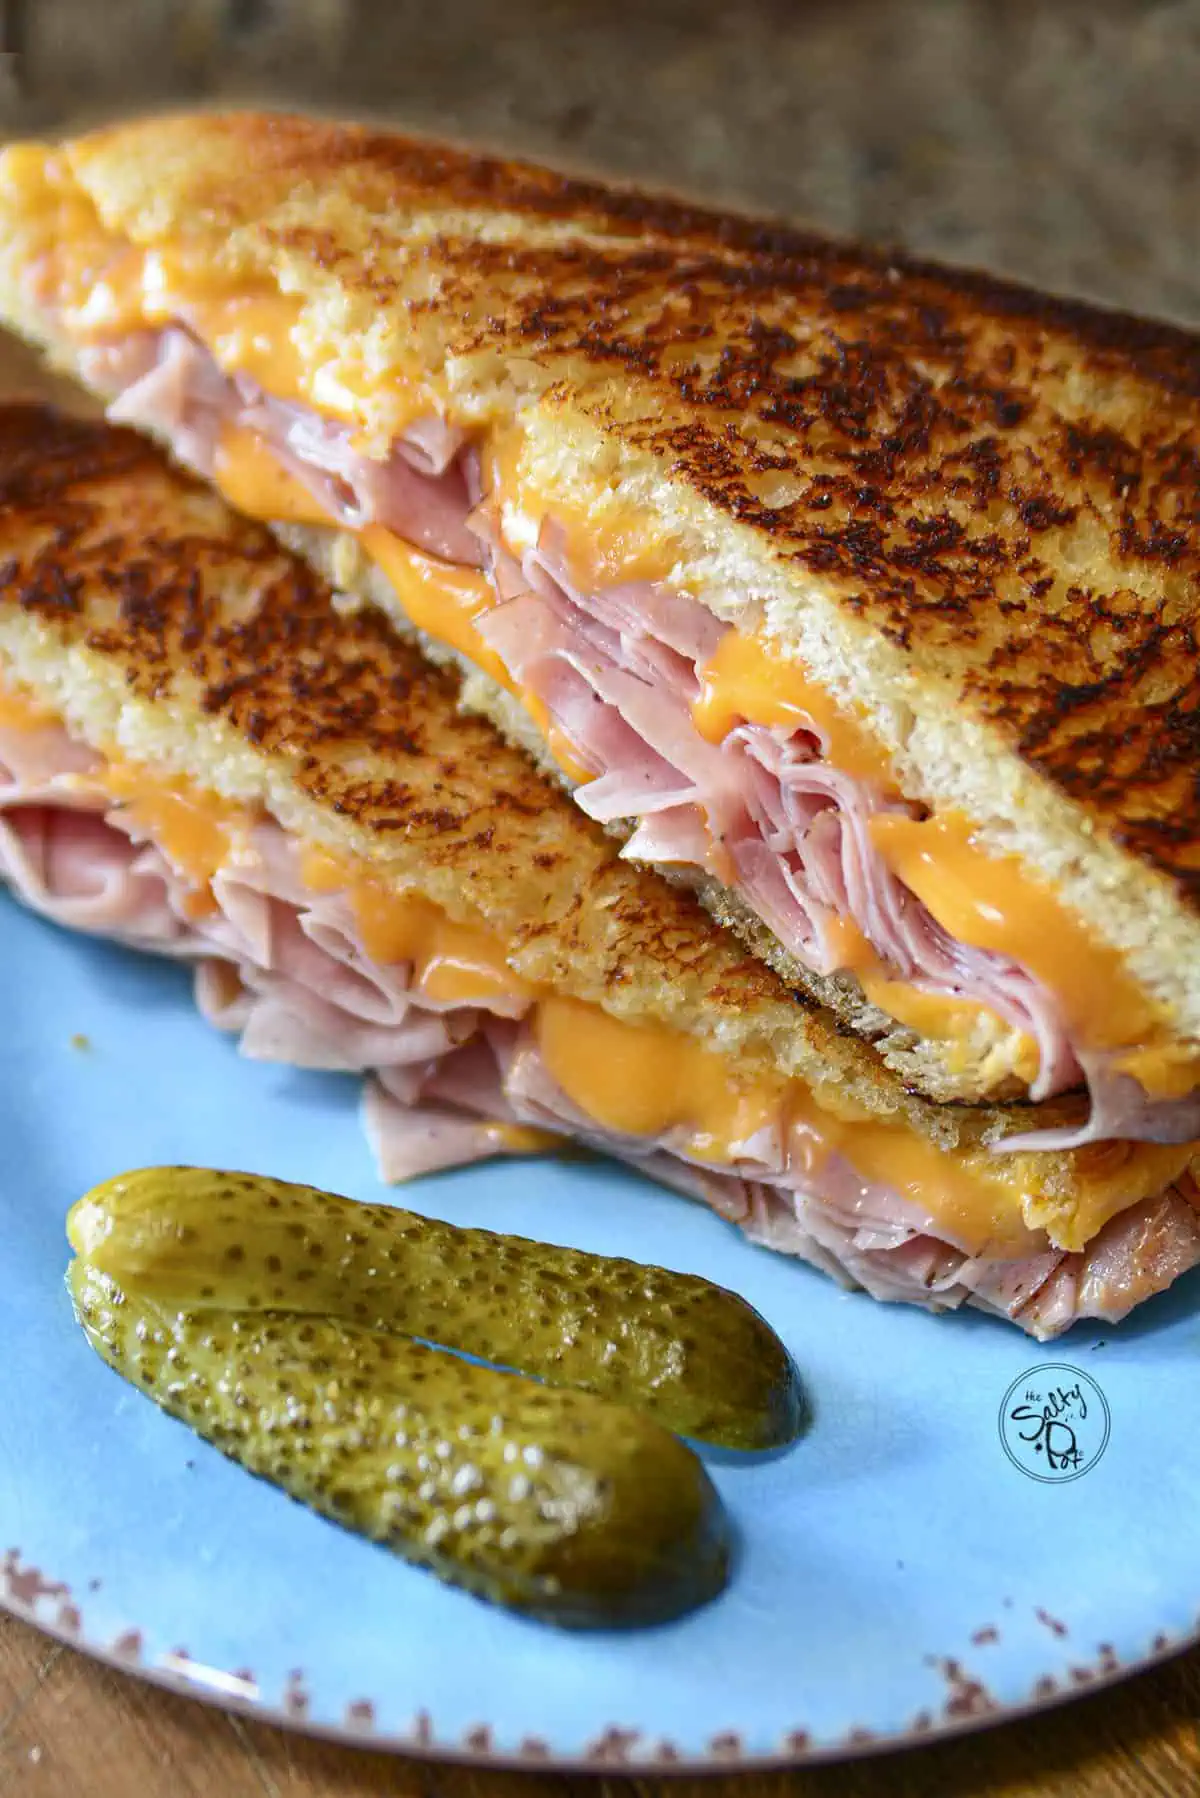
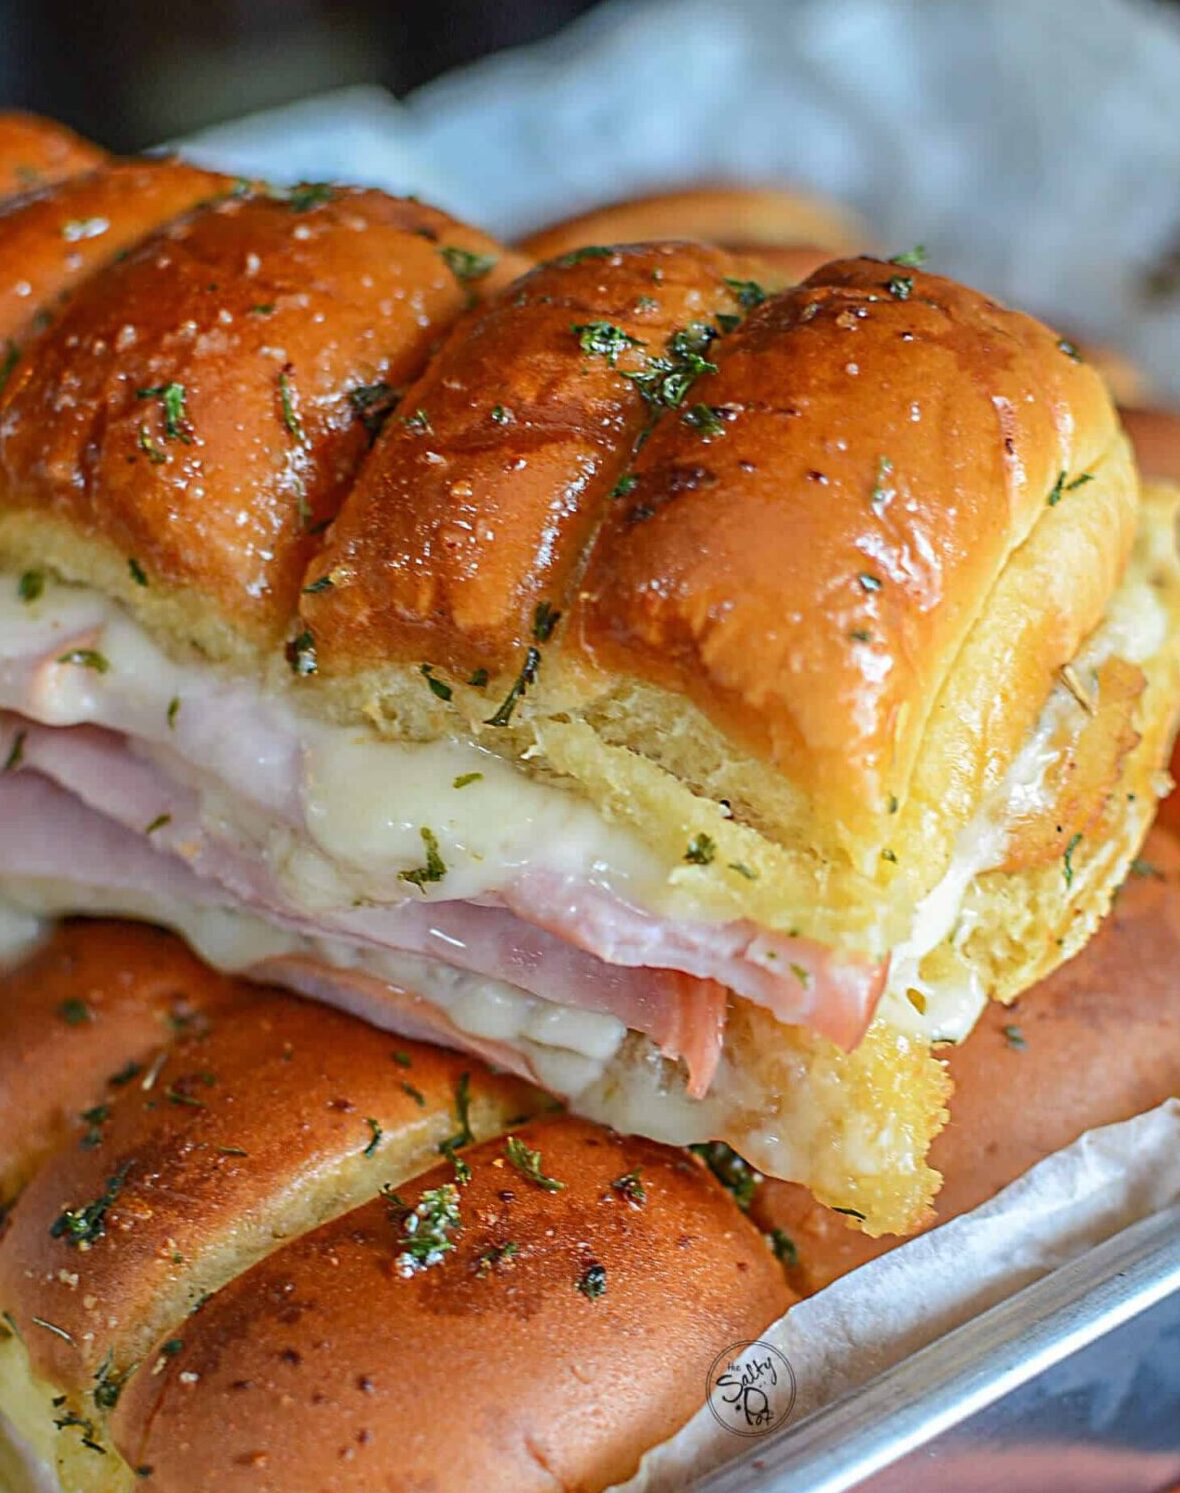
Melty Grilled Cheese And Ham – The Best Comfort Food
This epic grilled ham and cheese sandwich has buttery toasted bread, smoky salty ham, and gooey, melty cheese make a sandwich that seems sort of simple, but it just hits the spot EVERY.SINGLE.TIME.
Just like my (equally as epic) Easy Hot Ham and Cheese Sandwiches recipe, the ooey gooey cheese is key for a comfort food sandwich.
Make This Into A Full Meal
Don’t just make the sandwich…. make it a full, cozy meal:
Dill Pickle Pasta Salad – creamy, tangy, and perfect with warm sandwiches. The chilled salad is delicious with the warm gooey cheese!
Tomato Basil Soup – the classic dunking combo.
Air Fryer Zucchini Sticks – Like fries, but crispier and covered in parmesan!
🌟Ingredient Highlights
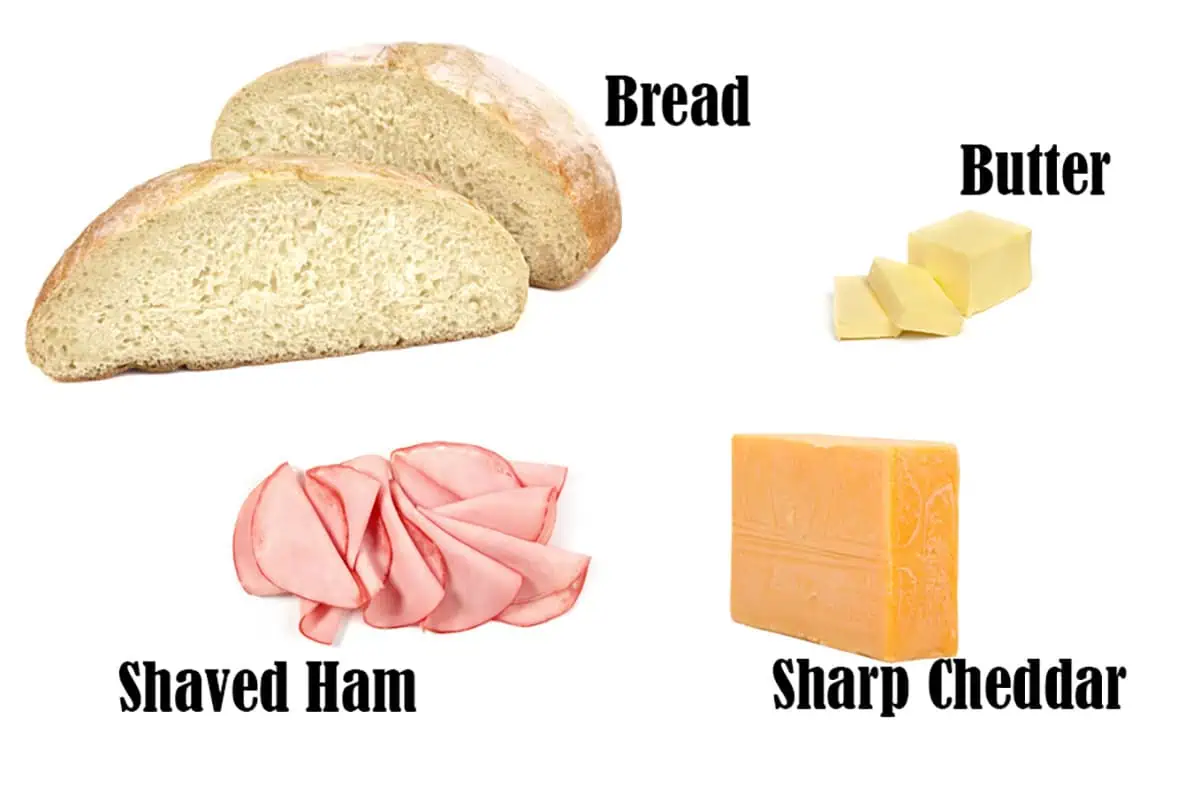
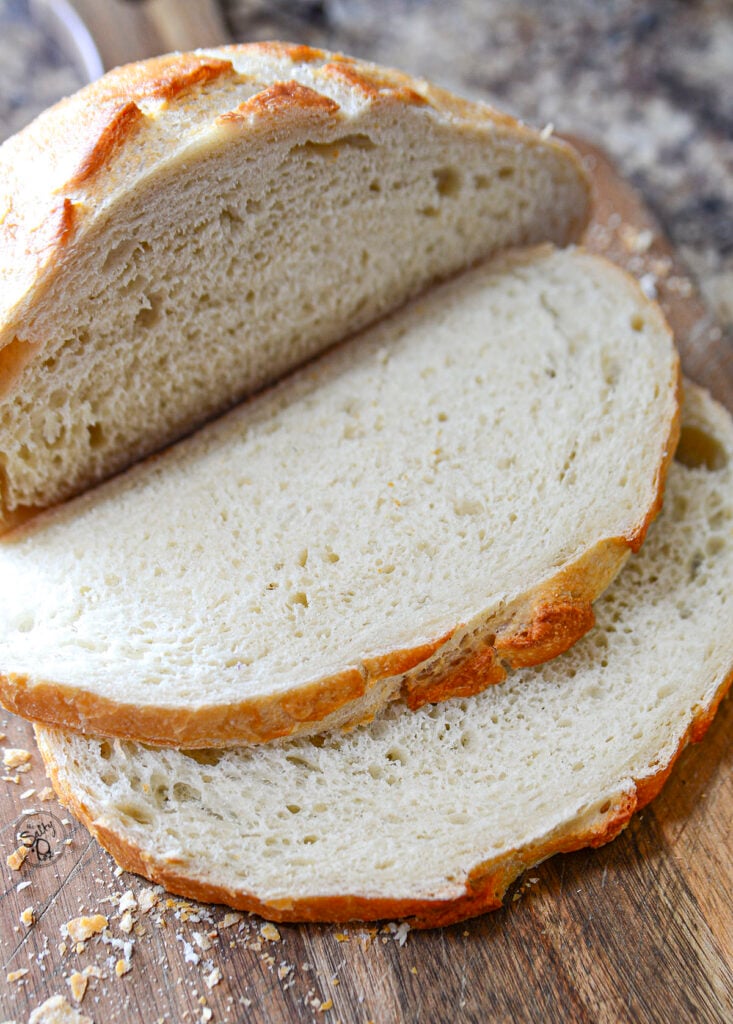
- Bread: I used my homemadeNo knead Dutch Oven Bread for my sandwich today, but almost any bread you love will work. White bread, brown or whole wheat bread as well as special artisanal bread would be lovely. If you can toast it, it will work.
- Cheese: The choices are endless, but I like a classic grilled cheese so I’ll typically use sharp cheddar. But if you’re feeling adventurous, swiss, provolone, pepperjack, or spicy havarti is also excellent to use.
- Ham: I have a local butcher shop that makes a delicious black forest ham that I order shaved, and I recommend you use your favorite shaved ham as well. I like to buy it shaved because shaved ham keeps the sandwich tender to bite into and creates more surface area for the flavors to melt together in that perfect bite. Other alternatives are listed below.
- Butter: Butter is best for that deliciously rich flavor and a nice crispy crust on the sandwich. Margarine can also be used as a substitute and for a lighter option, some spray oil will work.
Choosing The Right Kind Of Ham
You can use any ham you love for your sandwich. Here are a few options that taste amazing!
Honey Ham – adds sweetness to the sandwich without being overbearing.
Smoked Virginia Ham – The smokiness is delicious and adds tons of flavor!
Peppered Ham – has some spice to it and has a rich flavor that can’t be beaten.
- Spiral Ham – If you have a holiday dinner or any other occasion and end up with leftover spiral ham, it makes the most fantastic sandwich!
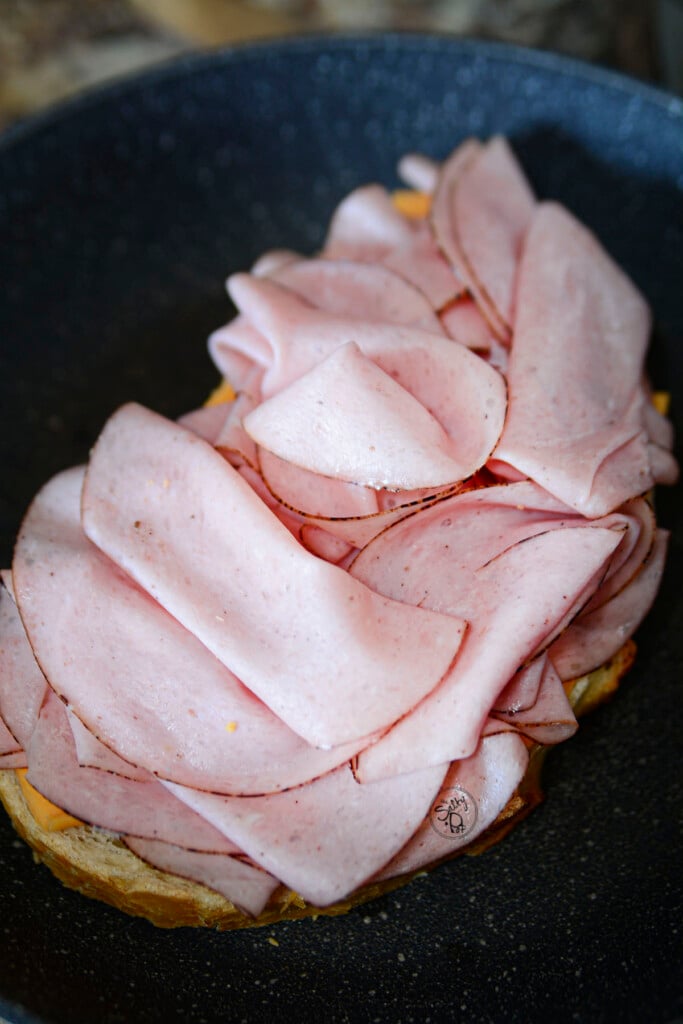
You can also use a Black forest ham, shaved thin. This is what I used today for my sandwich.
How To Make This Grilled Ham And Cheese Sandwich Recipe
PREP STEP: Bring the cheese out of the fridge about 10 minutes before making the sandwich so the cheese comes to room temperature. You’ll need a skillet and a spatula to flip the sandwich.
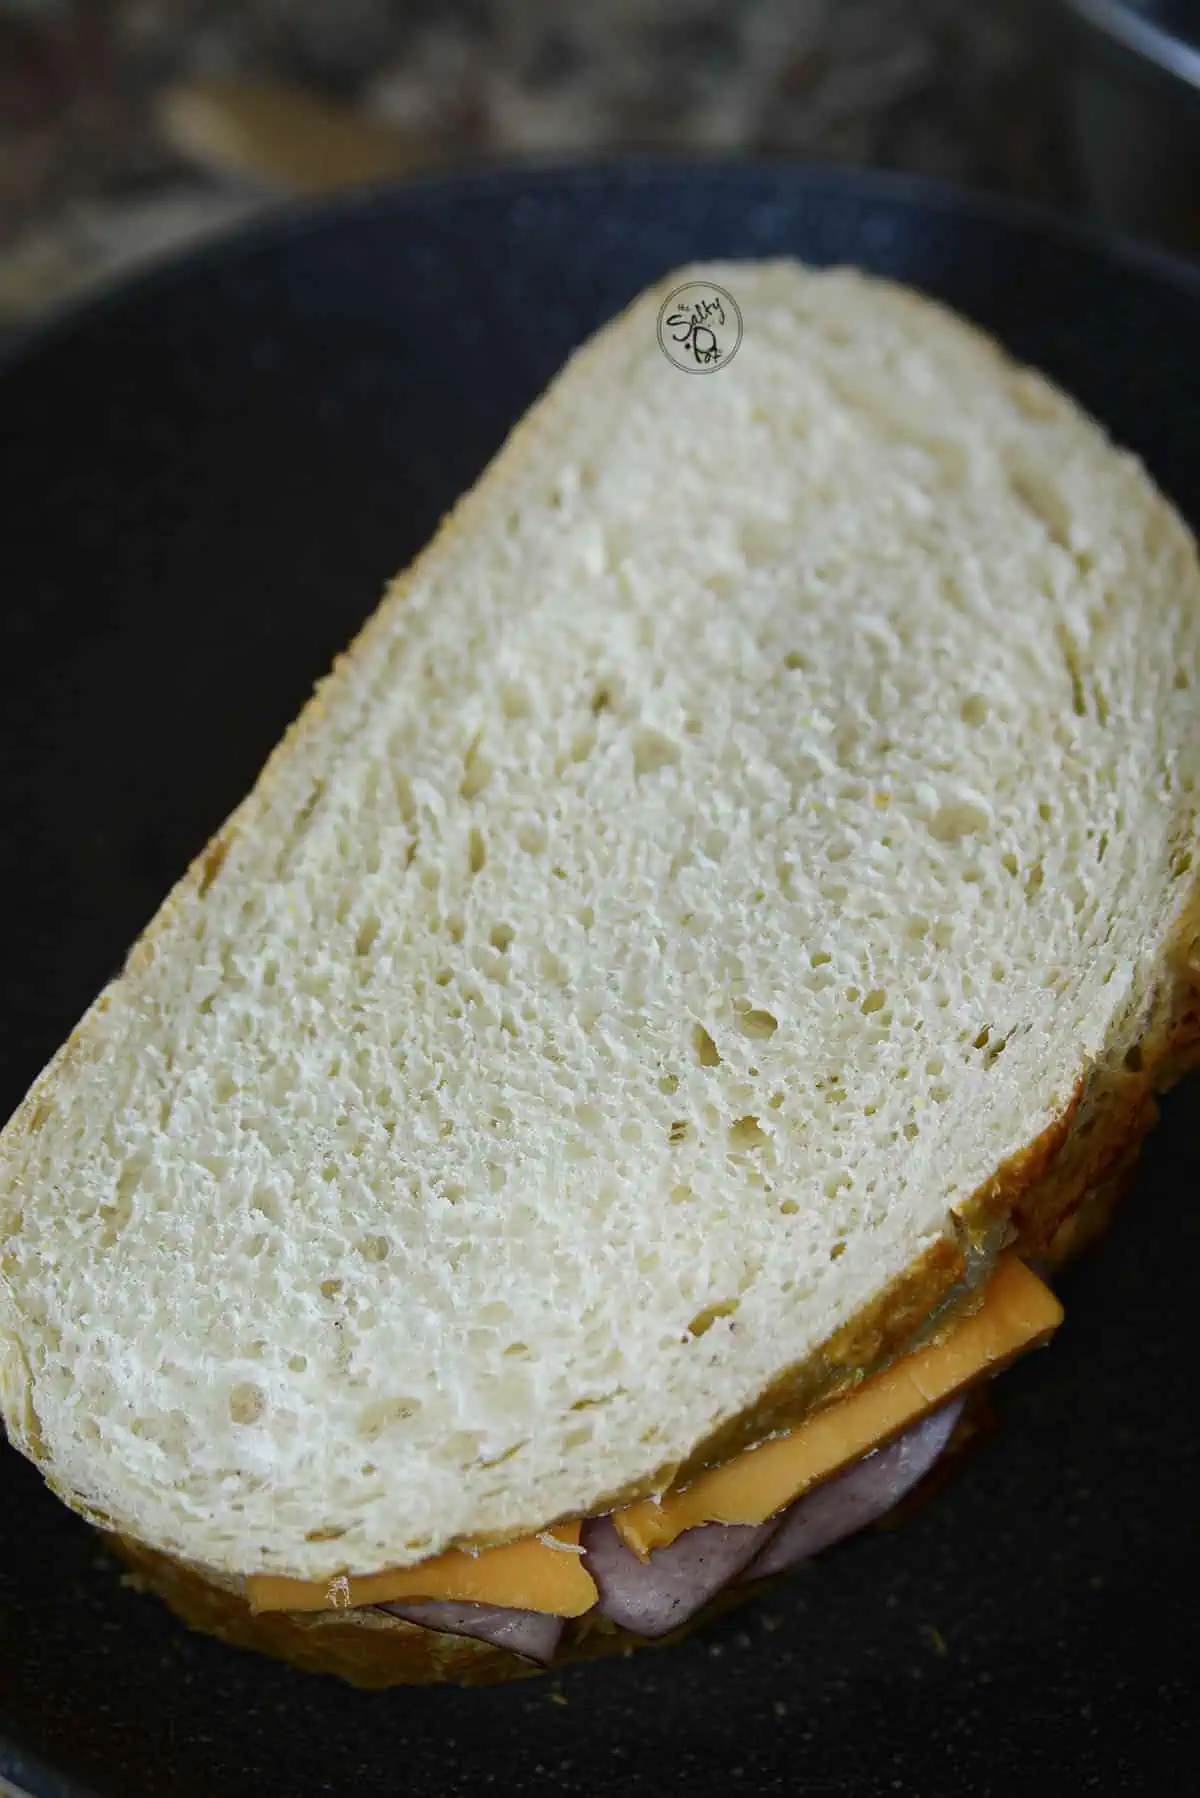
STEP ONE: I cut two nice big slices and then buttered one side of it. This buttered side will be the BOTTOM layer of the sandwich.

STEP TWO: Lay the buttered side down in the pan and after that, I just started layering the ingredients. I like putting cheese on both the bottom and top, kind of sandwiching the ham in the middle.
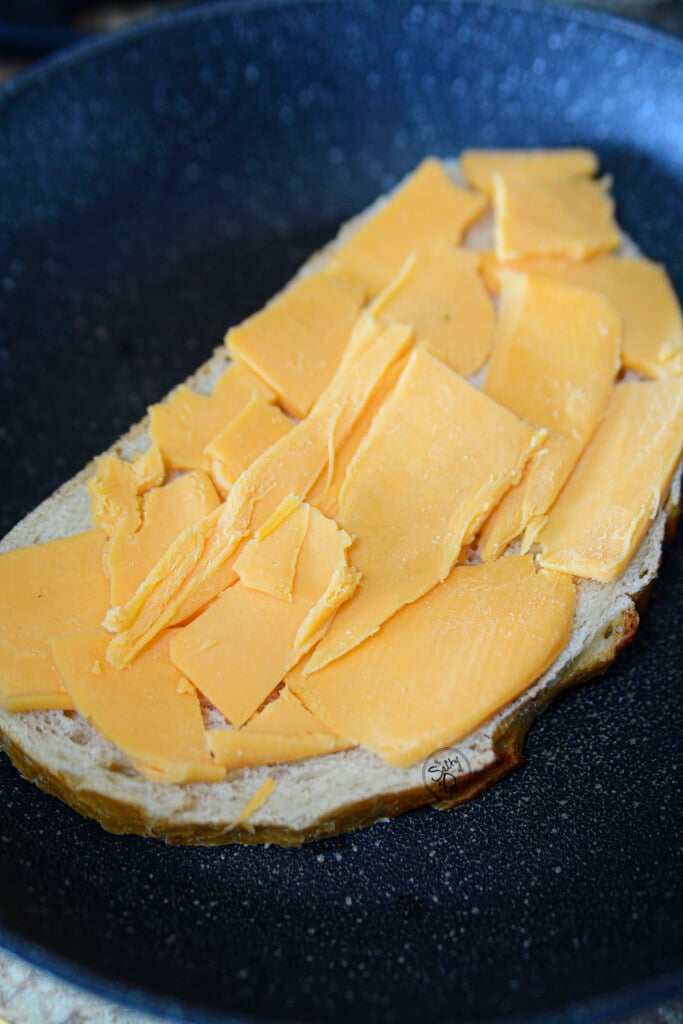
STEP THREE: Then, put the other piece of bread on top of the cheese. I buttered the outside so that when you flip the sandwich in the pan, will become the bottom piece.
SALTYPOT TIP: The important step is to fry it low and slow over medium-low heat. If you grill it too quickly, the bread will burn before the cheese melts. You want the sandwich to warm slowly, so the cheese gets a chance to get all melty and yummy as the bread toasts or, grills, in the pan.
After it’s toasted on one side, flip it carefully and do the same to the other side. Also, another tip is to cover the frying pan with a lid for a few minutes to trap some of the heat in there to help melt the cheese as well.
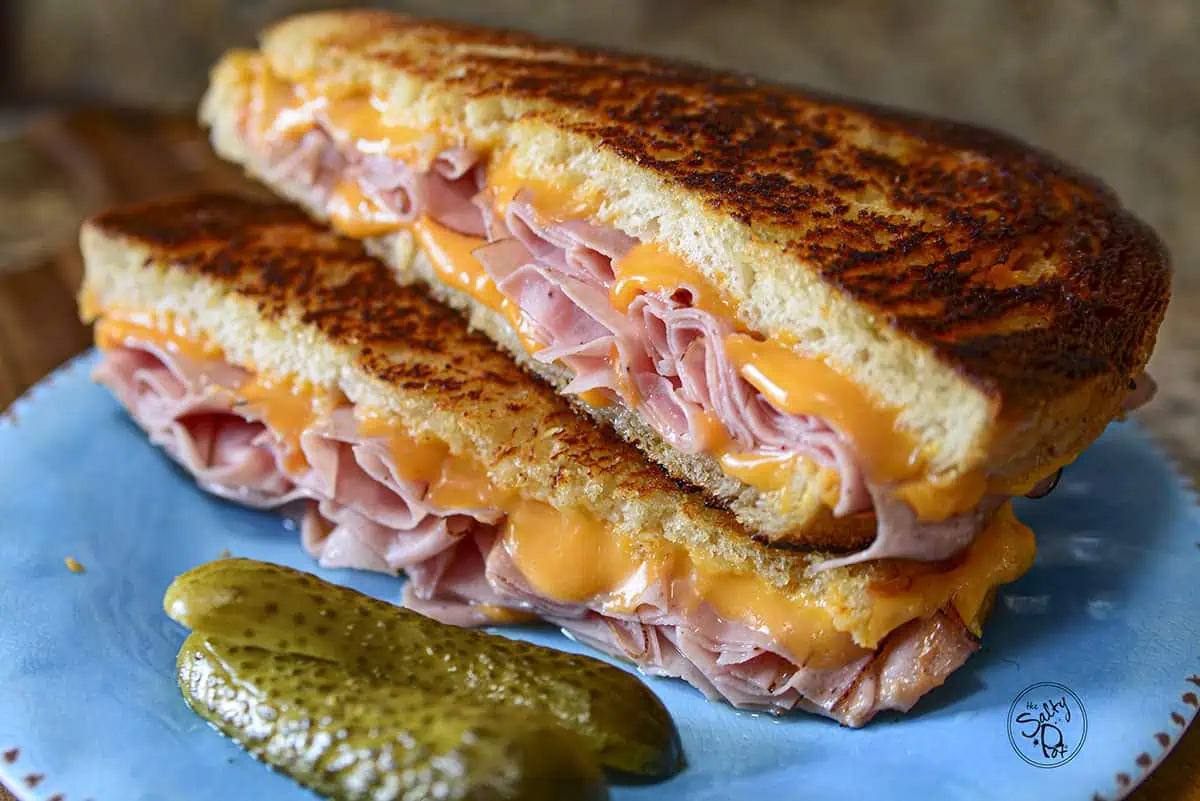
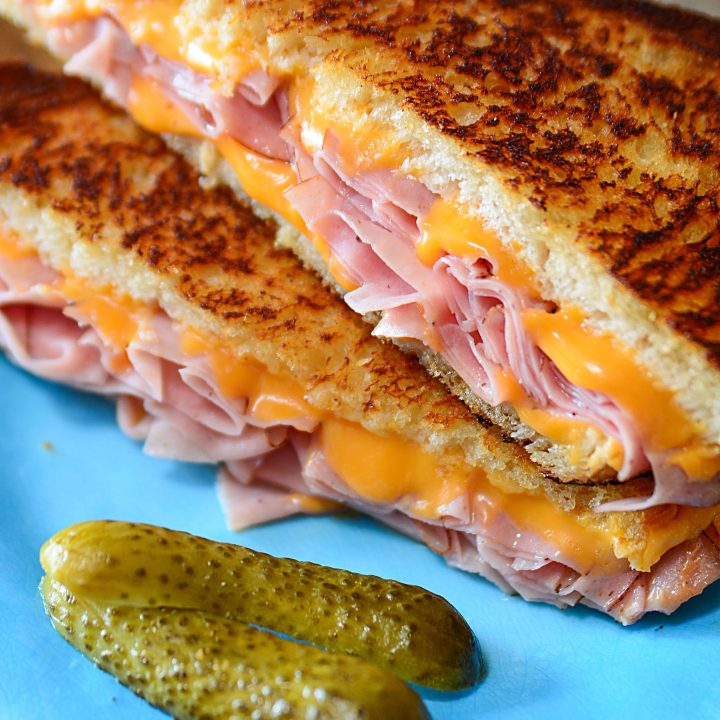
When it’s done grilling, turn it out onto a nice board and give it a minute or two to settle. Then slice, and ENJOY!!
Look below for all the exact amounts, detailed cooking instructions, and handy tips in the printable recipe card below.
🔥 Don’t Skip These Steps
- Use low to medium heat so the cheese melts before the bread burns
- Butter the outside evenly (don’t skip edges)
- Add cheese on BOTH sides of the ham for max melt
- Press lightly … don’t smash it. (We don’t want the cheese oozing out the sides)
Switching It Up (Other Additions)
You can make your sandwich with just bread, meat, and cheese if you desire. Nothing wrong with that my lovely!! But, depending on my mood, I like to add some extra toppings to change the flavor and texture. Here are a few of the things I love to use:
- Fresh vegetables – Believe it or not, adding some thinly sliced fresh tomatoes on top of the ham, or slices of avocado on top of the ham layer before going into the skillet is crazy good. I like it because the slow heat softens the tomato (or the avocado) and it kind of makes the sandwich ‘juicy’ without being sloppy or soggy.
- Condiments -Adding a bit of sweet heat like my Sweet Chili Pineapple Sauce to the bread slices, or some spicy horseradish, hot honey sauce, or even some homemade honey mustard would all be dynamite!
- Tang Factor – Super thin rings of pickled peppers or homemade BUCKET PICKLES would also be divine in this sandwich. Sounds wierd maybe, but SO delicious! The tanginess would play against the rich gooey cheese!
Is This Sandwich The Same Idea As A Cheese Toastie?
Yes. Grilled cheese and a cheese toastie are the same types of sandwiches. The only difference is that we’ve added ham to our grilled cheese, so technically, this sandwich would also be known as a ham and cheese toastie.
I hope that if you decide to follow this method for your grilled ham and cheese sandwich, you might try to add a few twists that were mentioned earlier, and then let me know how it went by commenting below! Thank you for stopping by The Salty Pot today!
~Joanne
The Ultimate Grilled Ham and Cheese Sandwich You Crave
Golden, crispy bread, melty cheddar cheese, and smoky, savory ham - this Grilled Ham & Cheese Sandwich is a simple yet satisfying classic. This easy recipe delivers the perfect mix of crunch and gooey goodness, whether for lunch or a quick dinner.
Ingredients
- 2 slices crusty artisan bread (thick-cut)
- 85g shaved Black Forest deli ham
- 8 slices sharp cheddar cheese (brick-style, broken into smaller pieces)
- 1 tbsp butter, divided
Instructions
- 1. Preheat Pan: Preheat a frying pan over medium-low heat.
- 2. Butter the Bread: Butter one side of a slice of bread with ½ tbsp butter and place it butter-side down in the pan.
- 3. Layer the Ham and Cheese: Add half of the cheese pieces, spreading them evenly over the bread.
- Loosely fold and layer the ham slices on top of the cheese, covering as much of the bread as possible.
- Add the remaining cheese pieces over the ham. - 4. Top the Sandwich: Butter the second slice of bread with ½ tbsp butter and place it, butter-side up, on top of the sandwich.
- 5. Grill it Up: Grill slowly over medium-low heat to allow the cheese to melt without burning the bread. Once the bottom slice is golden brown and crispy, carefully flip the sandwich.
- 6. Melt: Cover the pan with a lid for about a minute to help the cheese melt faster. Once the second side is golden brown and the cheese is fully melted, remove the sandwich from the pan.
- 7. Rest: Let it sit for a minute, then slice and serve immediately.
Notes
1. Taking the cheese out 10 minutes ahead of time will help bring it to room temperature so it melts more evenly and quickly.
2. Don't be afraid to use the leftover ham you have on hand. Cut it as thin as possible and make this delicious grilled cheese melt as usual.
3. I like to sprinkle just a light bit of salt over the top of the sandwich after grilling. Only do this if your ham is not overly salty.
4. Want to make it ahead of time? Assemble the sandwich and wrap it in plastic wrap. Store in the fridge for up to 1 day before grilling.
5. Try using mayonnaise instead of butter for an ultra-crispy crust!
Nutrition Information:
Yield: 1 Serving Size: 1Amount Per Serving: Calories: 383Total Fat: 25gSaturated Fat: 13gTrans Fat: 1gUnsaturated Fat: 8gCholesterol: 93mgSodium: 1513mgCarbohydrates: 17gFiber: 1gSugar: 2gProtein: 24g
All nutritional information is based on third-party calculations and is only an estimate. Each recipe and nutritional value will vary depending on the brands you use, measuring methods, and portion sizes per household.


I have made a huge amount of Grilled ham and cheese sandwiches for myself and my family. I grew up with them . The thing about what to call them depends on where you live.
I have been fortunate enough to have traveled to three English speaking countries.
And English, American and Australian English are all similar but different.
Tomato,Tomatoe.
Anyway the method to put the cheese on the top and the bottom is a great idea. I will do that next time.
My favorite ham and cheese is;
Black Forest Ham
Swiss Cheese
Sourdough Dark Rye
With a Hole Kosher Dill
And Ketchup and Spicy Horseradish on the side.
I know how to make these sandwiches and their cousins.
Rueben etc.
I’m always looking for new ideas.
Thanks for your effort.
By the way my wife is half Dutch and my children are one quarter Dutch. It’s a small world.
Thanks for commenting Mark!
Grilled ham and cheese! If my dad complains about this sandwich then I know it’s him and not me!
Thanks for making the simple dishes a little more gourmet when I’m working with so little while feeding an older parent with tastes set in stone that I will never be able to duplicate:)
Hi Megan! Your comment is so kind and beautiful, I appreciate it more than you know. I know our parents have their ways for sure and I hope your Dad liked the sandwich. Do your best girlfriend, that’s all you can do, and it’s more than enough!
Joanne – I’m sorry that you had such an unwarranted comment from another reader. I assume the person who said that it’s not a ‘grilled’ sandwich is, like me, from the UK. In the UK, a ‘grill’ is the domestic equivalent of a salamander and your description here would be called a ‘fried’ cheese sandwich. It’s so petty that it’s unbelievable and makes me almost ashamed to be British. The other person who referred to ‘a childhood story’ is just downright rude and your response was perfect in my opinion.
To the important bit – lol … I’m a very keen cook and have been for many years. 3 sons later, I’ve made countless ‘grilled’ ham and cheese sandwiches, as you can imagine. I feel a bit ridiculous saying this but Its never crossed my mind to put the ham BETWEEN the cheese! It’s a complete game changer. Tonight, for dinner, I’ve made tomato soup and YOUR genius sandwiches with Gruyère, thinly sliced smoked ham, tomato, onion salt and mustard. Everyone wanted to know what was different about the ‘cheese toasties’ as they were so yummy! It just goes to show that you can always live and learn.
Thank you so much for sharing this lovely recipe!
Thank you for your kind words Juney. I appreciate you taking the time to comment and your cheese toasties sound amazing!
I put the butter in the pan and fry one side of the sandwich in it then flip and do the same with the other. Easier I think? Love it either way.
From Norfolk UK!
Thank you for commenting John! I appreciate your input!
This is by far the best grilled ham and cheese recipe I have ever made and eaten. So easy and tasty as well! Thank you so much for sharing your recipe and the super easy directions. Keep up your excellent work!
Hi Suzi and thank you so much for commenting!! I’m thrilled that you enjoyed the recipe, and your sweet comment made my day!! Thank you!
Great recipe! This one gave me some good tips for additions to my own. Looks delicious too.
Thank you!
A grilled cheese sandwich that’s gone nowhere near the grill! It’s pan pried sandwich. Still delicious though
Hey Ben.. From Wikipedia : A toasted sandwich, grilled cheese sandwich, cheese toastie, or grilled cheese is a hot sandwich (toastie) made with one or more varieties of cheese (a cheese sandwich) on bread. It is typically prepared by heating one or more slices of cheese between slices of bread, with a cooking fat such as butter, on a frying pan, griddle, or sandwich toaster, until the bread browns and the cheese melts. A grilled cheese may contain ingredients besides the bread and cheese, as long as the latter is the main focus.
Have a nice day!
Wow that is a lot of information above on how to melt cheese with ham on a bread. It is literally three ingredients. Can we make a page without a childhood story of how to make toast that is the only thing more difficult I can think of to make. How did you think of the recipe? Is it new or did you steal it from Kraft,Carl budding, or was it wonderbread. Stay tuned next month we teach how to make peanut butter and jelly sandwiches.
There are many people who are learning to cook, people who want a different take on a classic recipe and we’re here to give that to them. If that doesn’t pertain to you then please, by all means, scroll on. We don’t allow bullying on this site so if you continue along this vein you will be blocked. Enjoy your day! 🙂
These Grilled Cheese sandwiches were amazing! Thank you for the recipe😊
I’m so glad you enjoyed them Sharon!! Thank you for taking the time to comment about them as well! Have a wonderful day!
Thank you for the recipe, I needed to know the time frame for cooking but you explained already 17 minutes .
Thank you again
I love this recipe.
Thank you so much Claire! You made my day!
No prob
This is an absolute staple at our house, and I serve it often for breakfast. It’s a great grab-and-go for my boys heading off to school and I love how quick and easy it comes together, fueling them with plenty of protein to get through their morning.
We do have them for lunch sometimes too, with a steamy bowl of tomato soup. The kids and hubby love to dunk their sandwiches into their soup.
Can’t go wrong with these yummies, and yours look so enticing…kinda want one now!
Aren’t they just awesome??!?!?! Thanks so much, Karen for the kind words!!